Puff Pastry and Pate a Choux
Episode 12 | 24m 39sVideo has Closed Captions
Puff pastry; rolling, cutting and making shapes from puff pastry; using pate a choux.
Puff pastry; rolling, cutting and making shapes from puff pastry; using pate a choux; Paris-Brest cake.
Problems playing video? | Closed Captioning Feedback
Problems playing video? | Closed Captioning Feedback
Puff Pastry and Pate a Choux
Episode 12 | 24m 39sVideo has Closed Captions
Puff pastry; rolling, cutting and making shapes from puff pastry; using pate a choux; Paris-Brest cake.
Problems playing video? | Closed Captioning Feedback
How to Watch The Complete Pépin
The Complete Pépin is available to stream on pbs.org and the free PBS App, available on iPhone, Apple TV, Android TV, Android smartphones, Amazon Fire TV, Amazon Fire Tablet, Roku, Samsung Smart TV, and Vizio.
Providing Support for PBS.org
Learn Moreabout PBS online sponsorship- Hi, I'm Jacques Pépin, and all of the thousands of recipe that I've made over the years require one common ingredients that never change.
The right technique.
30 years ago, I wrote a book about cooking technique and 10 years ago, I made this TV series, and the information is just as relevant as always.
I hope you find this lesson helpful in your kitchen.
Happy cooking.
Look at this pastry.
It seemed to have dozen of light layer.
This is what is called puff pastry.
And while this is a classic, and rather time consuming of making it, and very often people buy it anyway in the market, I'm going to show you a quick technique of making it yourself, and I'm going to explain also to you what really is puff pastry, and why it worked a certain way.
It is made of water, flour and butter.
Conventional dough is made also of water, flour and butter, but in different way.
There is two extreme in the dough.
You can take a dough, water flour, mix it together.
The flour will develop the gluten that is the protein in the flour, and as you knead it, it'll get tighter and tighter, and you end up with what we call a bread dough with blister very elastic.
On the other hand, if you take the same flour, and put butter, no liquid, you crush it into the the flour, and the butter together.
The fat will coat the protein in the flour, and you'll end up with a mixture, which is like modeling clay.
It's soft.
It doesn't have any elasticity, nothing at all.
This is cookie dough.
Between the bread dough and the cookie dough, all of the dough stays somewhere in between except for the puff past, which is done in a special way.
So the special way is that first, we starting like a bread dough with water, and the water, a dash of salt and a flour and water.
The water will change there.
I have a pound of flour, but I don't know exactly how much water I need.
I have to see depending on the moisture.
Depending on the moisture around.
(mixture blending) You see that bit dry?
No.
It's fine.
So that dough needed... (mixture blending) That dough needed approximately 9 ounces of water for that pound of flour.
Sometime I need less water, sometime I need more water.
It depend where you live in the country, that is it depend how much moisture are in your flour.
In full summer in New York, I've done a pound of puff paste like this with six seven ounces of water, and I've been in Tucson, Arizona and in Colorado, Spring, and use almost a full pound of water for a pound of flour.
So you can see there are differences.
For that first mixture of water and flour, we call the De Trump, and that we want to roll it.
Now the classic puff paste, when you do several upon, you that big rolling pin, which really help in your rolling.
I'm not doing such a great quantity, so I'm using a smaller one like this one, which is perfectly fine too.
You need space when you roll thing, and that you want to do a rectangle out of this.
The classic way is done not quite exactly the same way.
I'll tell you why.
Now the whole objective a puff paste is to prevent the fat from getting incorporated into the water, flour mixture.
It has to stay separated to create layer.
In a conventional dough, you mix everything together, and if you get together, you will end up with a pie dough.
I have a pound of flour, I put a pound of butter here.
unsalted butter.
You can see here.
And I arrange it on about two third of the dough itself.
Sometime I put the full pound, sometime I put a little less, maybe here I put a little less, I have a pound.
Let's say this give me slightly less.
So I will put, or maybe actually I'll put it up to here, which will be just as well because I will already give it a turn.
So I have two third of the dough is covered with the butter approximately.
So now the third which is not covered, I will put it on top and then fold that, break my butter a little bit there, and fold it in half again.
Now I have several layer of bread dough if you want, and a couple of layer of butter.
Now this is the way a puff paste works.
Conventionally you take the dough, you put the butter in the center, and you wrap it around.
So now you have a layer of bread dough, a layer of fat.
Bread dough, fat, bread dough, three layer.
You roll it, you turn it in third like a layer.
That's nine layer.
Roll it again, fold it in third, 21 layer.
You go to six turn, and you go to in the area of 1600 layer of bread dough and fat.
If you haven't done anything to destroy the layer sticking to the table or whatever, when you put it into the oven, the water in the bread dough, the water in the bread dough develop into steam vaporize.
But the fat waterproof it.
So it start pushing and developing into the multilayer effect that we have in Napoleon, vol-au-vent, and so forth.
So what I have to do here, I have to start rolling it this way.
I'm pressing it this way to help a little bit.
And there is two problem that you're going to have when you do puff paste.
One problem is that manipulation of the dough with your hand is going to soften the butter, and is going to start sticking all over the place.
The second problem is that, manipulation of the dough, you know, I mean the heat of your finger rather, it's going to soften the butter.
First problem.
The second problem is that manipulation of the dough will develop the gluten that is the protein, and it start getting very elastic.
Again, those two problem, there is a common remedy, and we call that a refrigerator.
You have any problem, you stop it, and put it into the refrigerator.
Now I've given it one turn, you see, and it's not too elastic.
So I decide I'm going to do another turn, and again, I press it, I roll it into pieces here, and there into that rectangle if you want.
Kep rolling it to about a inch thickness, and then again another fold.
Try to remove the flower from the center as you do it, and 1, 2, 3, you fold it in third, and the other third there.
And now when you roll it again, from that shape, you go to that shape, start rolling again.
That dough have two turn, it needs six turn to do a complete puff paste.
And after that of course you can use it, you can cut it, you can freeze it and shape it in many, many different type of shape.
That puff paste has now six turn, and resting in between.
Remember it's very important to rest in between because otherwise it come to a point where it gets too elastic, you cannot use it anyway.
Now the puff paste, you can really roll it very, very thin.
Now there is certain type of dough you cannot roll thin, but the puff paste you can roll thin.
It's a bit warm here, but that puff paste is a little bit sticky and that's what I'm using a fair amount of flour.
In any case, now you roll it.
Now when you start and if it's hard, it's good to press it like that into a dontation, turn it around, do the same thing on the other side, and again and now you roll.
This way.
You try to keep it about rectangular.
You know when you roll puff paste like this, it seems when people look at you that you're applying pressure all the way, and applying pressure all the way.
No because that developed the gluten.
What you do usually from here, I go to the center of the dough without really applying pressure.
Then I apply pressure, then I come back without really applying much pressure up to here.
Then I apply pressure up to there, meaning that I'm trying to extend the dough.
Another thing too, try to keep it wet underneath, try to keep it, flours rather underneath because the point is that, if your dough is on the table, if it doesn't slide, if you apply on top, and if you crush it forward, you're going to destroy all of the layer, you know.
So it is important to keep it, flour on top, and in the bottom, as you can see it shrink a little bit now, which show a little bit of elasticity.
So here this is already pretty thin, but I want do it even thinner than that.
I'm showing you a couple of thing.
Okay, here it is.
Okay, one of the first thing that we do is different type of vol-au-vent, different type of small things, and we call vol-au-vent a round thing like that, rectangular things.
Sometime with mark like this, you know that sometime you mark them, you make them bigger.
Like for example, this one, and just mark inside with this to have a little border.
So by the time it's cooked, it show a little border.
(upbeat instrumental music) Here is out to make a special square vol-au-vent.
First, I want to be sure that it's square.
So I go this way.
Yeah, it's square and I cut the side here, and here.
Then I open it again, I will brush with a little bit of egg wash, the side so it glues together nicely.
And at that point bring one side here, and the other side there.
This is how you create your square vol-au-vent.
If you don't want it to expand too much in the center, break it a little bit like that.
Another way that you do what we call the, Feuilletant Chaleur Croissant that are served with fish is by cutting with the rung cutter, and keep cutting like this.
So at that point if you were doing flour, you probably would do as I said before, to start with mark all of your, all of your dough, you know with the wash.
Then you can do a design on top if you want, like I'm doing here.
And then you start cutting it with this.
So all you do you cut those crescent shape thing that we call Feuilletant, which are used, usually served with fish, you know, decorated with fish.
The last thing I want to show you is how to make the sheath straw, which are served delicious, served with a consomme or other type of soup.
In fact, just mixing into your bread basket is great.
So what you do, you brush the dough with a little bit of egg wash, and this is a mixture of paprika, and Parmesan cheese actually, which you put on top on each side.
Then you want to do that on the other side in the same way.
Dough made dough is getting a bit soft, but this is how it's done.
You can even put water here to stick.
Its for the mixture to stick well on top here.
Could have a little more.
And now what you want to do is to cut strip out of this.
If I have enough, make sure you can even fold it on itself and cut your strip like this.
(pastry cutting) I will show you a couple.
Now for the sheath straw, look at the cookie sheet here.
I have a piece of paper, but it doesn't go to the end.
I take a sheath straw to extend it here, and I extend it to the end, pass the paper, and I crush it with my hand so that it's not going to move during cooking.
Going to stay there.
But that would be the way I would do the so-called a sheath throw.
You know.
Just this way and this way.
And then of course you cook it when it get.
Now to do the Croustade or the twist that we have, you take the same thing that we have here on this side.
Put one hand here, the other one hand and twist it this way.
And that's basically what you do.
When they're finished cooking, you trim the end of it, cut them into pieces.
And this is what I have here.
The twisted one, the Croustade and the other one, the straight sheath stroke.
(soft instrumental music) A classic of the French cooking is the Pâté chaud, the cream puff dough, and the cream puff dough of course is used for many, many different type of things.
This is what I have here.
It's basically a mixture of flour, and the water with a little bit of butter and eggs.
Now sometime you do it with milk, sometime with water, it depend on how humidity it is.
But basically you boil the milk or the water, add your flour, a little piece of butter, add your flour, you mix it, and you do what is called the the Panade, there at that point.
And in the pan you put your eggs.
Now this is used in a deep fryer.
You know Panade, it's used for Pâte à Choux, Éclairs, different type o for example, Parisian gnocchi, and Parisian gnocchi done with this.
So it is used a lot.
Now we are going to pipe it, and do a couple of things with it one way or that you can, if you're alone in the kitchen, you know when you put your pastry bag, place it like this so that it doesn't fall all over the place.
Stay on the side, and you can place it into a container like this, which makes it slightly easier to fill it up.
Now, if you use a whipped cream for example or a meringue, then you can really fill up a bowl a lot, but hen you use, when you use a Pâté chaud, I probably already have too much in there because it's very hard to push out.
So you put... You have to fold it into a nice fold like this, place it here, and now you keep that hand close, press with that part and keep twisting as you use it.
As it pull out.
So we'll start doing the classic chaud, and when you do the chaud, you keep your pastry bag on the side, apply the pressure here when you feel is big enough, you step and move up to have the smallest possible tail.
The puffy roll is so cool, which is usually stuffed with ice cream, and served with a chocolate sauce are small chaud.
So it's basically the same.
The Eclair on the other hand is the long one.
This way you stop and bring it back up to avoid the tail.
Again.
So many things are done with it.
Now, very often in that case here for example, what you want to do, if you have a bit of a tail, you have water, you get wet paper towel or something, and you can use that on top to press your tail or just with your finger like that, it will eliminate it.
Now, most of the time this is not even needed because you brush it with a wash, a wash with a beaten egg of course, and that will eliminate the tail, you know.
So you brush it with a a wash like this, and you can leave them outside a little bit after so they dry out a little bit you know.
It give you more.
Now the wash that I have here, what I have to, it's an egg except I throw out half of the egg white to have a bit more egg yolk.
The egg yolk give you color, but the egg white give you the shininess.
You can mark it with a fork if you want also.
You know, like this.
You know that give effect to the one or two.
You can even do a cross on top of this.
And sometime we even put some almond on top of the egg layer you know.
All of that are different variation that you can do.
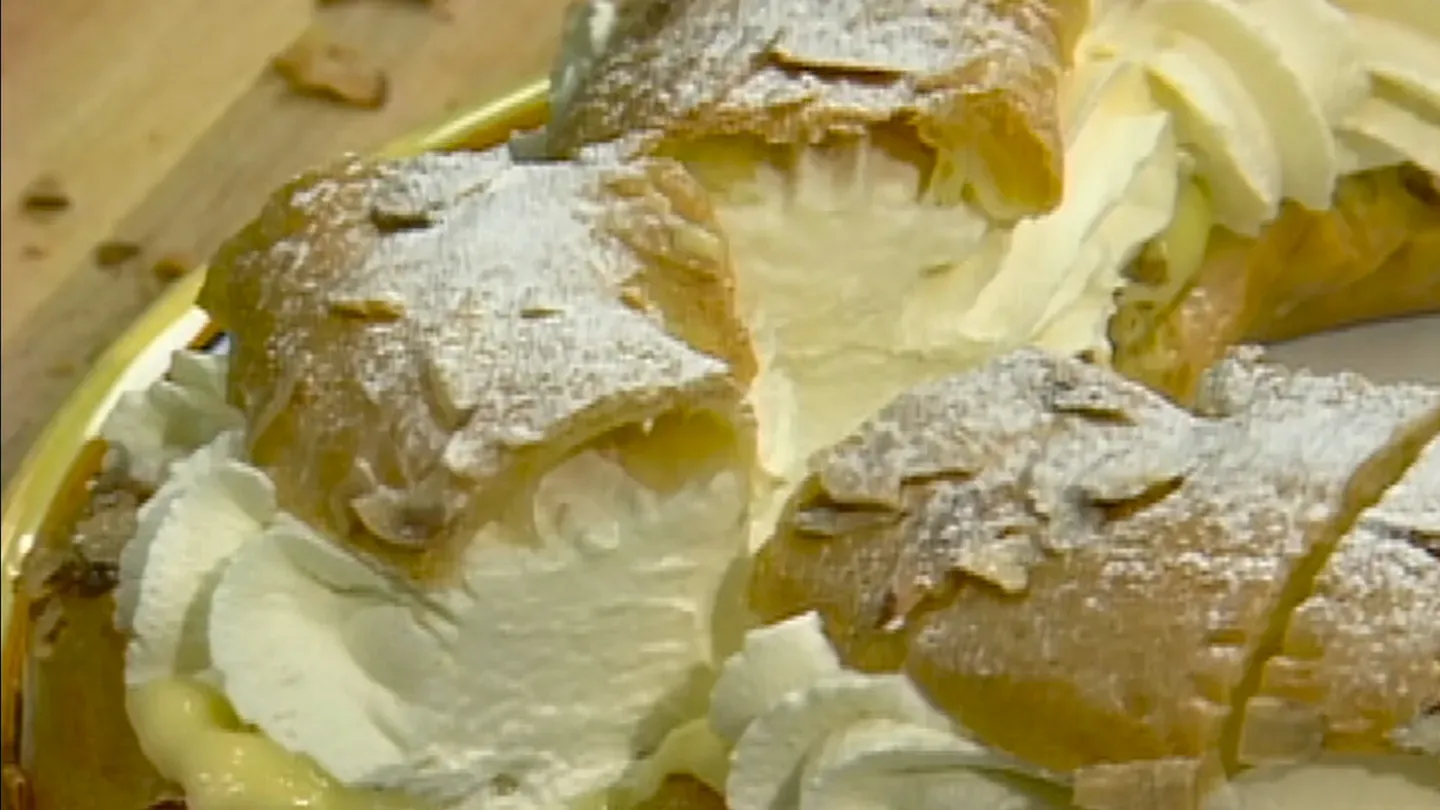
Now another very classic, the third with the Pâté chaud is the Paris-Brest cake.
And Paris of course is the town of Paris and Brest is the town in Britain.
And there is a very famous bicycle race, which is called Paris-Brest.
It goes from Paris to Brest.
So that cake is done in the honor of that thing.
So it's in the shape of a bicycle wheel, you know, so I'm marking it here.
See, one of the mistake that people do when they pipe, they keep it, I'll show you a little bit here, they keep it too close to the thing, and when they go like that, it's very difficult to have a proper tray.
Look at the way I do here, I will follow that line, but I don't touch the thing.
I press it there and I let it fall gently, and come around so that the shape itself will be right.
You see the same thickness?
Now I finish here, the second ring, I don't want to start here because there'll be too much pressure on one place.
So I start somewhere else here.
I had an air bubble inside where I put my dough again, put an air bubble.
So you have to be careful of this, and usually on top of that you do a third one, which you start again in a different place.
Okay.
This is about the size of a classic Paris-Brest cake.
So what we do now is the same thing.
You know, you brush it with your eggs, a little bit all over often as I say, you do that 20, 30 minutes, let it dry a little bit in the kitchen.
This will take a long time, and something that I should probably mention, which is very important, especially home kitchen, don't open your oven, and fool around with it while it's cooking.
It's going to collapse you know, so you leave it, if you open the oven, just peel into it but don't pull the tray out and look at it because it's going to make it collapse.
I could again, bring the three ring a little bit together with the fork here, which give it a bit of the bark of a tree, you know, effect.
And this is filled up with all kind of different fillers, you know.
And finally on top of this, we are putting some sliver almond is good on top of it, and that will go into like a 375 degree oven.
It will take a good 45 minute to an hour, and even at the end you can shut up your oven, and continue cooking it or cooking it even if the the with the door slightly open so that the moisture goes out, and it doesn't collapse.
I mean it should be holding its shape, but the mixture itself should be soft when you bite into it.
It should not be like dry bread.
And this is what a Paris-Brest is.
Now the Paris-Brest is cooked, it has time to rest for a while, still a bit soft.
And I want to show you how to fill it up.
First, I'm taking one of those knife, this very knife to cut the top.
That is the lead.
Now you don't cut it in the middle, you cut... And as you can see, I'm making the cake itself turn around rather than me moving with the knife.
Okay, so I have the top here.
Now you see the texture inside of that Paris-Brest.
This is soft, soft dough, and a lot of people remove that, but this is very good.
There is nothing wrong, it is cooked dough, it's soft dough, it's cooked dough.
It should be a bit soft like that, just the way it is.
So what we want to do here is to put some Crème pâtissière, so called now.
Crème pâtissière, the classic pastry cream that we put, and that we want to put a little layer in the bottom of this.
Sometime the classic pastry cream is flavored with Panade, for example.
A Panade, the kind of caramel cooked with almond and made into a powder.
But I like it just with this sometime it flavor with coffee or chocolate or other thing.
And on top of that, I have some chopped, I mean ground, not ground really just broken hazelnut, you know, fill that I put in the oven, and I think that gives them crunchiness in the middle.
There is no sugar or anything on this, and maybe I'll push them down a little bit here.
And we finish the top with whipped cream.
This is a very luscious, very rich type of cake that you do, and we want to really splurge with that type of cake.
So you want to have heights also.
I'll move it around.
This is beautiful whipped cream, what we call in France, Crème Chantilly.
Or even a little more on top.
And on top of that, theoretically our cap go right on top of it.
But I tell you it's pretty difficult to cut in the dining room.
So here is what we do here.
We cut it into portion right there, which makes it much easier all around.
So just follow the same shape.
Don't let it go.
Won't let it out of your shape, and you won't even see it by the time it's placed back together.
And I have cut that in like the 11 portion, usually 12 portion.
You want to do this here, a bit of powder sugar on top.
(sugar sprinkling) And then it goes directly to a beautiful plate where you put it into your dining room.
And as you see, this way when you get it there, and when this is the time to cut it, then it become with that knife or any other knife because you slide that knife in between without crossing, and you can really cut your slice without any problem at all that otherwise if you don't pre-cook, if you don't pre-cut rather that type of thing, as you can see here, it comes out very easily.
It becomes very difficult to cut at the table.
There are obviously many more technique you can learn to make yourself a better cook.
But I hope I have encouraged you to pick up a few more skill in the kitchen.
Thank you for joining me and happy cooking.


Support for PBS provided by: