Pots, Pans and the Perfect Egg
Episode 3 | 24m 32sVideo has Closed Captions
Selecting pots and pans; breaking and hard-cooking eggs; making mayonnaise.
Selecting pots and pans; breaking and separating eggs; poaching and hard-cooking eggs; making mayonnaise; a country-style omelet.
Problems playing video? | Closed Captioning Feedback
Problems playing video? | Closed Captioning Feedback
Pots, Pans and the Perfect Egg
Episode 3 | 24m 32sVideo has Closed Captions
Selecting pots and pans; breaking and separating eggs; poaching and hard-cooking eggs; making mayonnaise; a country-style omelet.
Problems playing video? | Closed Captioning Feedback
How to Watch The Complete Pépin
The Complete Pépin is available to stream on pbs.org and the free PBS App, available on iPhone, Apple TV, Android TV, Android smartphones, Amazon Fire TV, Amazon Fire Tablet, Roku, Samsung Smart TV, and Vizio.
Providing Support for PBS.org
Learn Moreabout PBS online sponsorship- Hi, I'm Jacques Pepin and all of the 1,000s of recipe that I've made over the years require one common ingredient, never change the right technique.
30 years ago I wrote a book about cooking technique and 10 years ago I made this TV series.
And the information is just as relevant as always.
I hope you find this lesson helpful in your kitchen.
Happy cooking.
(upbeat music concludes) The consumer now is faced with so many parts when you want to go and buy a pot that you really don't know what to choose.
And I want to discuss this a little bit with you and tell you why you should choose one over the other.
Basically you take a pot because of the heat transfer.
That is the way the heat is absorbed into the metal and transfer to the food.
Now there is two different type of cooking.
That's where people get confused.
You cook wet or you cook dry.
When you cook dry, you saute a steak or a piece of fish, or you brown bone or you do a roast of chicken, a leg of lamb in the oven.
You want crystallization of those juice in the bottom of the pan to create a juice.
You know, to create a great sauce.
Now when you cook wet, it's when you do a soup or you boil water for pasta, or you do anything like that.
For that, you need another type of metal.
The best metal in term of heat transfer is, beside silver, which when I was a kid they used still to do a little pot in silver, is copper.
Thick, heavy copper.
Now I have unlined copper here.
We use those unlined pure pieces of copper for specific things.
Because anything you put it unlined copper will acidify.
So for example, this is a sugar pan.
You cook sugar in there, because the sugar, the acid will prevent crystallization of sugar.
Now the second best after the copper is aluminum.
Now you can see an old aluminum pan here.
The heat transfer is good but you have a lot of discoloration in it.
If you don't use it, if you use a whisk in it, you have residual metal in your (indistinct) to a certain extent, although it's probably vastly exaggerated.
But in any case, you do have some problem with the plain aluminum this way.
With the plain copper, going back to the copper here, if it's as it used to be, it used to be lined up with tin and the tin will wear out, eventually nickel, nickel will wear out.
Now it's bonded with stainless steel so you have all of the advantage of the heat transfer there and the advantage of stainless steel inside.
This is steel, pure steel.
Steel is very good, the heat transfer is very fast but unless you use it all the time it's going to stick.
It mean that this is a crepe pan.
I have one at home, it's hanging on the wall, I don't use it.
Why don't I use it?
Because it sticks.
Why does it stick?
Because I don't use it.
This is a vicious circle and that's what happen.
If I am in a restaurant, I use it all the time, it never stick.
That's different.
This is also aluminum, but it's what is called anodized aluminum.
It's a process by which they find it when they send people to the moon.
It's covered in a natural surface above the aluminum which comes and that prevent the discoloration you have in there.
Now don't confuse that with nonstick pan.
That has nothing to do with nonstick pan.
It stick this way, but it is an anodized aluminum.
Then we move to stainless steel.
Stainless steel is one of the best metal, the most durable, the lightest, very strong.
No discoloration, no taste in it.
But if you have a thin piece of aluminum, the heat go there, you have a black spot right there.
No diffusion throughout the metal.
If you do dry cooking, that is if you saute a piece of thing.
So what do they do for that?
Then you have a pot like that which is thick heavy aluminum but it's lined up with stainless steel.
It's lined up all around.
So you have the transfer of aluminum and the advantage of stainless steel, no discoloration.
Which is what I have in that copper pot over there.
The same idea with this one.
I have a sandwich here.
This is only a sandwich of aluminum.
As you can see here that's stainless steel.
This one is even better as I said because it's not a sandwich underneath, the whole thickness go all around.
In term of heat transfer, it goes down now to enamel pot.
Then you have here a cast iron pad.
And the cast iron pad, you have those old skillet you can get emotionally attached to it.
I have an old one at home but then you have a lot of discoloration, rust coming to it and so forth, but it's still good for many things.
Then this is a steel pan which is enameled on top and this is cast iron just like that one is.
Cast iron with enameled cast iron.
Those crock pot type of things I use a great deal to do a roast something or a stew.
You have a nice cover and you bring that from the kitchen directly to the dining room and it's very nice also.
If you've never sauteed before, a lot of people are confused by the technique.
Let me show you how to do it.
And here I have some dry beans.
You can use whatever you want, doesn't really matter to show you now.
Notice that that pan has that type of sway.
So the technique is going to be different than with this one.
Now with the sway, I move the pan into a circular or even elliptical motion.
And one of the mistake is to do it too high.
So bring it a bit lower like this and you do it here and you move that into that type of circular or elliptical motion.
You know, that's what you want to do.
Now if you do it with that type of pan, because the side are straight up, if I do the same motion, it will splatter against the end of it and it can burn you if you have oil or whatever you have in it.
So because of the side of it you cannot move it with a circular motion.
What you do here, you really make a jump, saute it and all that when you saute potato to whatever you want to saute.
And that's important in the kitchen to know the right technique, it will help you make your life easier.
(upbeat music) Eggs are one of my favorite, maybe the most versatile food in the world.
There is 100s of different ways of doing them, although they've been malign a great deal in the last few years, eggs are very good for you.
Now here I have different type of egg, the brown egg, the white egg, those are tiny quail eggs.
According to the US Department of Agriculture, it doesn't make any difference whether they are white or brown, the nutritional content is the same.
Now I wanna show you how to break the egg and separate them.
Now don't break the egg to start with on something pointed like that.
It tend to put the shell into it.
I always go on something flat like this.
The conventional way is to break the shell in two and move the yolk from one side to the other and clean up on the outside.
Here you have to be sure to separate the eggs entirely, you know.
And very often I would say in general people will leave close to a third of the egg white attached in the shell and attached to the yolk, so it makes a big difference.
Now how to break the egg and separate them.
So you can do it this way or very often when I have a lot, I just break all of my eggs into something like this and then after that I grab the yolk and move the yolk from one side to the other.
You know, separating all of it, even the white, there is a white sinew on one side, you can see sometimes it's more visible.
This is called the chalaza of the eggs, C-H-A-L-A-Z-A.
The chalaza of the eggs is a sinew which hold the yolk in suspension in the center of the shell.
So that has nothing to do with the germ of the eggs or whatever.
Now I want to show you how to do poached eggs.
I have boiling water here and it should be a light, light boil.
Although when you start putting our raw eggs in it, it starts lowering, you know, the temperature.
Now into that boiling water we put a little bit of vinegar.
Acidic it tends to hold the egg white together.
Now here, you know, you put, this is plain white distilled vinegar, you don't need raspberry vinegar or anything like that in there.
So what you want to do is to break again your eggs so they are flat and go on top of the water and directly open it into the water.
Now you'll see that the white will come slightly to the surface.
It stopped the cooking there for a while, but basically now I don't want it to boil anymore because it's going to toughen it.
Of that white come to the surface here, I start dragging with the bowl of a slotted spoon.
I'm dragging it here just to make it move so it doesn't stick to the bottom.
And I can see this one has moved, this one also, so I know now it's not going to stick.
So I will continue cooking them, lift them up, occasionally you go underneath and you test them with your finger.
Takes about three minutes, four, sometime five minutes depending how you like them.
I go about three, three and a half minute to have a soft egg in the center.
Now let me check the egg again.
As I say, go underneath.
And you can see how it's springy, very, very tender here.
I would say it's enough.
So you lift it up into a bowl of clean water.
That does different things.
First it wash up your vinegar.
You know, and cool off the egg.
It means that in a restaurant you can do your eggs hours ahead.
So here is, you see those eggs here that I just take out, what you want to do, just on your hand like that, you trim a little bit of the white and you look at them.
Now you can see that this is, in a sense, the underneath of the eggs, that's where it came.
This is the top of the egg.
You usually present your eggs this way.
Yeah, I present them on a crouton for example.
You can see really where the egg white went around it.
That would be the underneath of the egg.
Again, we trim it.
Let's say you transfer them to clean water, that would be the top of the egg you see around there.
Now I can cut that egg for you and you'll see how soft and tender it's going to be inside.
You see it is creamy, it has that type of texture which is what a poach egg should be.
Now we're going to hard cooked eggs.
And I say hard cooked because they should not really boil.
If they boil too fast, the albumin, which is the egg white will get tough.
Now how do you see that an egg is cooked or not?
This one is cooked, this one is not cooked.
If I take a raw egg and try to spin it, it'll spin a little bit as you can see, but because it's raw inside, it's not going to go (indistinct).
Now the more it's cooked, the more it spin.
When it's totally cooked like that, it will stand up on the back of the egg like this.
As you can see, this is a totally cooked egg, totally solid that is.
Now the first thing that I want to do when I do eggs, you can see that whether they are white or not on the round part of the eggs, not the pointed part but the round one, this is where there is the air chamber, so-called air chamber.
And this is a little pocket of air that you have there.
Now when you put that into boiling water, the air pressure make often the shell crack.
So what you do, you do a little, you prick it a little bit here with a thumb tag like this to release the air pressure from there.
You can see when I put that into the boiling water, the air pressure is going to be released from that hole.
So you have boiling water here and of course the temperature is going to go down as you put it in there and that should actually lower the temperature even now.
And you will see here from those eggs, the temperature, the air pressure being released.
So that should cook in, barely cooking, barely boiling cooking water for about 10 minutes.
Now what happened is that there is sulfur in the egg white.
The sulfur goes away from the heat so it goes toward the center of the eggs and when it meet the egg yolk with the iron in the egg yolk it create a chemical reaction which give you the green tinge all around the yolk and the strong smell of sulfur.
So, that's one problem.
The second problem is over boiling it, which toughen the egg whites.
So those I've been boiling for about 10 minutes now.
As soon as they finish boiling 10 minutes, what I do, what you wanna do is to pour out, in the sink of course, you pour out the water.
And you see those eggs here, what I do at that point, I bang it all around to crush the shell.
You know, now the shell is crushed, that goes directly into ice cold water that I have here.
Now a common mistake also is that people don't leave it long enough in the cold water.
It has to stay long enough so the sulfur, which now is close to the egg yolk, feel the cold across the egg white and dissipate in the water.
And if you do it properly you're going to have a nice hard cooked egg, which is not something easy to do and which is usually not done well.
Now I can show you those eggs here which have been cracked.
So now that they have been cracked, they are easy to peel.
Usually you would want to peel those actually under running water.
So the water goes between those shell.
That's it.
And now if I cut that egg, and this is a good way of cutting eggs, you will see that the center of the egg is beautifully, a beautiful color without any green tinge.
You know, without any green around the yolk.
I like it just slightly soft in the center as I have it here.
Now this is an egg which has been left into the boiling water as it's often done and I did it on purpose just to show you the difference in the color of that egg.
So you see if I break that egg or even if I cut it in half just to show it to you, you're going to see the classic way that very often you get it in restaurant with that green color around the yolk and of course that strong smell of sulfur and a very, very tough egg white.
So even in the sample way of cooking a hard cooked egg, there is certain technique which are very important.
And now let me show you how to make a mayonnaise.
I know a lot of people buy their mayonnaise done, but it's very easy to make your mayonnaise.
In the last few years, however, people have been afraid of using raw eggs because of salmonella.
And, if you really object to it then you might as well not do it.
But I will tell you that with a certain amount of, if there is a certain amount of acidity that it is the pH is low enough, then that will eliminate some problem.
Another thing too that I have done, I have brought the egg yolk, like when you do a sauce, to 160 degree temperature.
Salmonella is killed at 160 degree or 140 degree if it stay more than three minutes.
So I've brought that temperature to 160 and used them after.
Another thing that you could do, another alternative is actually to use a commercial mayonnaise, which is done with pasteurized eggs.
And that mayonnaise, you use a little bit of that mayonnaise to start and you continue your own with mustard and so forth.
Now when you do a mayonnaise, here is what I do.
The egg yolk, mustard in it, freshly ground, I mean salt, and freshly ground pepper.
This is the base and with that vinegar.
A little bit of vinegar.
Let me show you a little trick about that, that I do with that vinegar.
Push that on the side.
When you use a cork, this is the cork of a bottle, which I, I'm cutting around to make it smaller so that it fit into the, my bottle of vinegar.
And now that I know it's going to fit into it, then I cut two wedge on each side to use as a pourer.
I do that with, also with the, you know, soy sauce or anything like that.
You know that's a way, watch out not to cut your finger, but in any case you do those two tiny wedge here, you can put that inside and now we have a nice pourer that you can use when you do vinegar, soy sauce, any of this.
Okay, so what I have in there, I have the egg yolk, mustard, salt, pepper, and vinegar.
This is the base of the mayonnaise and I put that into a wet towel around so that I have two free hand to do it.
I can do it with olive oil or with peanut oil, any type of oil or a mixture of those oil depending on you.
Now conventionally you're going to be told, go very slowly at the beginning otherwise it's going to break down.
And it's true but you don't have to go that slow.
As you can see, I'm not being that careful.
And with two egg yolk you can do quite a lot of mayonnaise.
Now you can see that mayonnaise is taking very nicely.
The important part there, more important than anything else, is to have the oil at room temperature.
If the oil is ice cold, you're going to have problem.
Now you see that mayonnaise is basically finished there.
Now you present your mayonnaise very nicely if you want.
You can use a little spatula to mark it if you want.
Now that mayonnaise now is what we call a mother sauce.
That mayonnaise is transformed into a sauce tartar, a sauce (indistinct), any type of sauce, many, many type of the cold sauce start with the mayonnaise.
So what you do, you may want to smooth the top a little bit and with the ridge of your spatula, you make a little bit of a design.
Present your mayonnaise this way sometime, or a tartar sauce, you know.
If you have a bit of extra one or I have here put a touch in the center of it.
This is very simple but it is a nice presentation.
(upbeat music) If I had to judge how good technically a chef is, I probably would ask him to do an omelet.
It is difficult to make a real good omelet and there is different type of omelet.
I'm going to show you two type of omelet.
A kind of country French omelet, which is basically the way we do it in America.
And then a classic French omelet.
One is not better than the other, it's just a different technique, a different taste, a different look that you have in it.
In the first one I'm doing an omelet with four eggs here.
In the first one, salt, dash of pepper.
All I'm going to do is to stir it well first and cook it so that I have a fairly large curd of egg and slightly brown all around.
Which is the look and the taste that we want to do country-like.
A little piece of butter in there.
And I have here a beautiful pan because that pan doesn't have any corner.
You see it has a beautiful sway.
It's a nonstick pan, so it's ideal.
It's an omelet pan, actually.
Now notice that my eggs to start with, I have no pieces of egg white hanging.
So it's not like you just stir the eggs back and forth, you have to go from one hand to the other to really break it so that you don't have any long piece of egg white.
Otherwise you have those becoming white in the plate, in the skillet as it's cooked.
So what we do here in the country omelet, let it brown a little bit.
See the eggs, the butter here will be browned a little bit, which in the classic omelet I don't want to brown.
So clean up your pan good.
And here, you don't have to worry too much.
You move it occasionally to take the large curd like this and those large curd, replace them by liquid.
This will be totally different in the classic French omelet where I move the mixture very, very fast, as fast as I can to have the smallest possible curd.
No browning at all because the browning will toughen the albumin.
I want something very tender and very soft in a classic French omelet.
In the country style it's different.
Now how long do you cook it?
It's entirely up to you.
You can have it slightly wet in the center.
I like it a bit wet.
I would say that here my omelet is still a little bit wet here, which is the way I like it personally.
That would probably brown it just a minute or so, then kind of fold it in half like this.
I would at that point maybe put a little piece of extra butter if I want in the bottom here to brown the bottom of my omelet.
And now I'm ready to invert the omelet.
This way here you change hand, you grab the handle this way, you bang it a little bit to make it slide to the end and you turn it upside down.
You have a nice beautifully browned omelet.
This is a country omelet but you can see fairly large curd and all this.
One way of doing it.
Now for the classic French omelet, the technique is different.
First cleanup your plate, your skillet rather, put it there.
I have a great amount of heat on that pan and this is what I want for a omelet.
And as you see, it is a gas stove.
And of course the gas is going to be much better than electric because you want to have the flame to go around.
And a good stove should give you a great amount of heat for an omelet as well at a very low setting if you want to simmer something.
So there again I have four eggs.
In that omelet this time I put a little bit of chive, actually a classic omelet (indistinct), finer omelet in France.
You have chive, parsley, tarragon, and chervil, which is a classic.
This one just a chive omelet.
So you can see here that my pan is hot but I don't want it as hot as the other one.
So again, we put it in there.
And now, contrary to what I did before, just letting the eggs get into large curd here with the bowl of, of the fork, I want to bring this around and stir it up fast as I can.
Smallest possible curd, and at the end of it, about at the end of it, like now, I want to bring all of the mixture I bring on this side.
As you can see, basically everything is there.
That is instead of having one layer, which I roll like a carpet, everything is there.
Run my knife around, bring back the lip, and you can see here I want to have a nice half moon shape.
Run this behind to bring back that lip.
Hit it there, which you can see, bring it up.
Then push it down.
You want a nice corner and you don't even want to brown it further.
This is the time between the lip now that you would want to stuff it if you have some type of stuffing.
We change hand again, bring that this way.
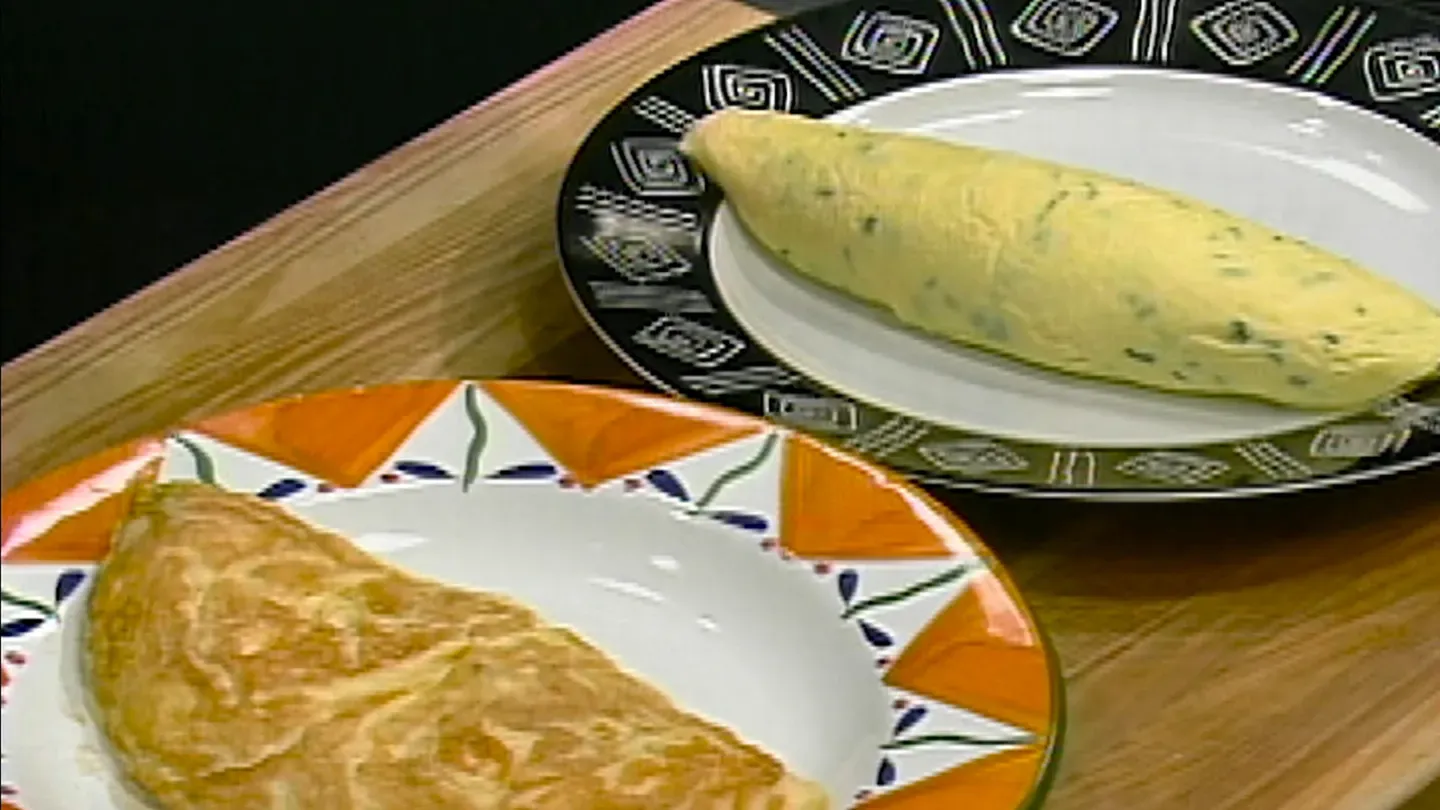
Next, bang it to have it to the edge of the pan, then invert it to have an omelet, a classic omelet, which should be white like this or pale yellow.
Just pointed at the end like this, smooth without any plate.
This is what a classic French omelet is.
And as you can see, quite different than that.
And as I said before, one is not really necessarily better than the other, it's a different technique and a different taste.
The curd are going to be much harder here.
And if I cut this one open to show it to you, then you will see that the center of that omelet is very creamy and very soft, very nice, which is the way the classic omelet should be.
There are obviously many more technique you can learn to make yourself a better cook.
But I hope I have encouraged you to pick up a few more skills in the kitchen.
Thank you for joining me and happy cooking.


Support for PBS provided by: