Lamb & Veal
Episode 6 | 23m 42sVideo has Closed Captions
Trussing and boning a leg of lamb; preparing veal steaks; breading veal; preparing Wiener Schnitzel.
Trussing and boning a leg of lamb; preparing veal steaks; breading veal; preparing Wiener Schnitzel.
Problems playing video? | Closed Captioning Feedback
Problems playing video? | Closed Captioning Feedback
Lamb & Veal
Episode 6 | 23m 42sVideo has Closed Captions
Trussing and boning a leg of lamb; preparing veal steaks; breading veal; preparing Wiener Schnitzel.
Problems playing video? | Closed Captioning Feedback
How to Watch The Complete Pépin
The Complete Pépin is available to stream on pbs.org and the free PBS App, available on iPhone, Apple TV, Android TV, Android smartphones, Amazon Fire TV, Amazon Fire Tablet, Roku, Samsung Smart TV, and Vizio.
Providing Support for PBS.org
Learn Moreabout PBS online sponsorship- Hi, I'm Jacques Pepin, and all of the thousands of recipe that I've made over the years require one common ingredient that never change, the right technique.
30 years ago, I wrote a book about cooking technique, and 10 years ago, I made this TV series, and the information is just as relevant as always.
I hope you find this lesson helpful in your kitchen.
Happy cooking!
The third piece of a meal is usually meat or poultry.
I'm going to show you the proper technique in the kitchen which will save you a great deal of money and learn for yourself what the butcher used to do.
And also, I will show you how to carve and present the food very attractively in the dining room.
So, let's get started.
This is a spring lamb.
By this, we indicate a lamb between eight to 12 months old.
Before that, very tiny lamb.
We call it a baby lamb.
And because the myoglobin, that is, the muscle tissue, the juice in the muscle tissue is not in yet.
The meat is very, very pale.
In a baby lamb, the whole lamb is about 20 pound.
A leg like that would be about a pound and a half.
This is about eight pound.
You can see the quality of the meat look are waxy and white.
The fat is on top.
Remember, I'm removing basically all of the fat, here.
The strong taste is always in the fat.
And in that context, you have to realize that even if I were using a so-called New Zealand lamb, because this is a domestic lamb, which, by definition, is milder in taste than New Zealand or Australian lamb.
And this has nothing to do with the quality, it's purely because of climatic condition.
But in any case, what would happen is that even if I use a lamb from from Australia or New Zealand, if I really trim it of all fat, it can be very, very mild.
So, here we have what we call, as I say, a spring lamb, eight to 12 months old, and I'm removing the fat from the top.
This is a leg of lamb.
The whole leg, here, I have the whole leg, including the big bone, here, which is the pelvis area.
And at the end of that there is the joint of the femur, if you want, going there, and the tibia, if you want the whole leg.
So, this is the whole leg, and very often, at the market, you buy half of it.
When you buy half of it, buy the lower part, not the top part, because you have that big bone inside.
So, then, again, removing the fat, removing the fat, and even that skin on top that we call the fell or the pelt, most of it, I want to remove.
Now, that piece of meat is usually done medium rare or rare.
I mean, it's a question of taste.
Again, when the animal is very small, we have a baby lamb, the meat is white, you cannot do it rare.
So, we do that meat medium for the baby lamb, sometime called Easter lamb, we serve it at Easter.
As you get to the spring lamb like this, you do it medium rare, usually.
By the time the animal get older and it become a mutton, so called, then, again, it gets strong in taste and you do it well done, you do it in stew or whatever.
Not much that you can do with the fat from the lamb.
I do package of it and give it to the bird outside sometime, it's fine.
But that's about it.
And on the other side, we are removing, now, that bone.
Now, this will go into a stew.
You see?
And now, we continue removing most of the fat here, and that large bone, we are going to take out.
Most of the time, as I say, when you get it, you are not going to have this.
Now, the boning out of the big pelvis bone here is the same for any leg.
And if you have a leg of pork, for example, then that leg of pork, if you happen to cure it, that is, to put it into salt, and after you dry it, that if you put it outside to dry, you're going to end up with a prosciutto.
If you cure it, and if you don't dry it, but cook it, you will have a ham.
Usually, in the large meat, like veal, for example, or beef, then that leg is divided into all kind of different muscle, which I'm going to show you in a second.
Now, I want to remove this, and the idea is really just to follow the bone, here.
And I don't know, it's not that difficult, really.
Even if you cut a little bit here, there, it doesn't matter.
You can see here, the socket here with the end of that bone, there is a nerve, and I cut right through that, and after, you continue on the other side.
You see, the chef when he bone out doesn't bone as close to the bone as the butcher.
The butcher sell the meat, but the chef cook it, and if you want a good stock, you want to keep a little bit of meat on top, trim out the fat.
So, that, again, for stock, and that piece here for stew.
What I have now, the whole piece basically clean, this is what we are going to call in French gigot.
The gigot is the whole leg of lamb, which is classic on Sunday to have a whole gigot with the family.
What do we do to that gigot?
Conventionally, there is a little bit of fat here left, but not much, really, that will melt during the cooking.
It's really very, very clean.
What we do there, usually, we put sliver of garlic.
And the sliver of garlic, here, you want to cut it so that they're slightly pointed.
You see those sliver of garlic?
You cut it so that you have a bit of a point next to it so that you push it with the point of a knife, put it in there, and push it down into the meat.
So, this is starting the gigot.
With that gigot now started, you put salt, pepper top of it, a bit of herbes de Provence if you want, that is dry herbs, oregano, thyme, and so forth.
Put it into the oven, and that should be about 130 degree internal temperature.
When I was a kid, as an apprentice, we used to put our finger here along the bone, push it inside, and if the point of your finger was lukewarm, this is the way we calculated how to cook it.
Now, this is, as I say, the classic gigot in France.
Now, if you want now to bone out the leg of lamb, which is another way of doing it, now we bone it out.
From the top here, I put it on its back, and as you can see, there is the bone that I mentioned before, The end of the pelvis.
There is the femur, and then the knee, the articulation, if you want, and the back down.
So, I will follow that bone, right there.
That's where you start.
Don't have to worry about it.
You cut it a little bit, and as soon as you cut it, you're going to see the bones, and then you follow the bone.
Your butcher will be able to do this.
But as I say, if you buy it this way, it will first be less expensive.
You can divide that piece of meat, if you have a small family, into the different muscle and do different thing with it.
Now, if you were doing the same thing with a leg of veal, then you would have to divide it because all of the muscles are different and are used for different type of things.
So, as you see here, I follow the bone, keep going around.
Use a sharp knife, of course, for that.
There is special boning knife.
You can have a boning knife.
I'm using here, actually, just a plain paring knife, if you want, and it's perfectly fine if the knife is sharp.
Now, here as I said, this is the femur bone, like your knees and the lower part.
Again, that goes into your stock.
Great meal, that great soup that you do, that scotch barley soup special in Scotland.
Now, at that point, I have the whole leg, here.
Now, I can close it again and put that into the oven, or I can open it more and put it on the grill.
Often, we do.
Now, you see, if I were to open it more, I see there is a separation.
I start cutting at the end, here, and it separate.
See, all the meat will separate into different muscle.
For example, that larger muscle here is the top round.
Next to the top round, you have two pieces of meat here which is the bottom round, and it's made of the iron and the flat.
It's difficult to see here.
At the end of it, here, this was part of the shank that I cut a little piece.
That could be the shank.
That would be stew.
The top part here where you see the knuckle from the knee, which I have to remove, actually, the top of the knee is called the top knuckle and that make a beautiful roast.
And finally, that part here where you had the most amount of fat which was at the top, that part of the hip, and that the top sirloin.
Those are basically the different part of the leg, and the leg can be leg of veal, leg of lamb, leg of chicken, or leg of anything.
The muscle remain the same.
The problem is that you have fiber which go in that direction here, fiber goes in that direction here.
That's why those muscles are separated in larger animal to do scaloppine and other thing.
Now, the advantage of opening it as I do, it's, again, you can remove all of, most of the fat from the inside.
Like here, I know there is a big lump of fat.
In fact, in that lump of fat, there is a gland.
I don't know if you can see here, that gland.
And sometime, people say that that gland make the meat bitter, so you gotta remove it.
I don't know how accurate it is, frankly.
But in any case, here, if I wanted to grill that now, what I would do, I would open that slightly, and open that slightly so that the meat is equally of the same thickness so that it cook on the grill at the same amount of time.
For me, if I want to do what we call a roulet, that is, a roll, then I would season it, salt, pepper inside.
Now, I could have crushed garlic, here.
I could have different type of herb.
I could have a mixture of a little bit of garlic, onion, parsley, whatever inside, a bit of a stuffing, if you want.
And I could put all of this together and bring it like this and make a roast.
There, I just put seasoning inside.
That's all.
So, here it is.
You do it in a compact way, and you would want to attach it, of course, with a string like this.
And you can see that type of string is cotton twine, kitchen twine, we call.
And it has to be cotton.
Don't use something in nylon.
Don't use something very, very thin, also.
People used to use something too thin, and it tend to cut your finger or cut into the meat itself.
So, we do a loop like this, and after that, what you do is a simple large loop, like this.
You see that loop here is really not complicated.
Again, you start from this, you do that loop, then you grab that loop and slide it underneath.
Then, ease it into it, then tighten it a little bit.
Again, you do it.
This is a very good technique which is used in many, many different way in the kitchen.
As you see now, that hold pretty good.
You can turn it upside-down.
Now, doing all that, I have too much string, here.
This one, you bring it around so that it look the same way bottom and top.
Here we are.
Again, here and here.
See, the butcher may do that.
Actually, he may do half of it.
But get it from the butcher, most of the time, he won't take enough fat out, because of course, he sell it to you.
So, what you do, you ask him to do it, then you do the rest of it, remove a little more.
Then you get to the end, you tighten it again, and basically, you have your roast ready.
Now, you could do that ahead, a few hours ahead, especially if you put herbs in it to let it marinate and so forth.
But then, you would not want to put the seasoning like the salt on top of it, now, because the salt will tend to draw out the moisture from the meat if it's done too much ahead.
There is no problem, you can do it before you roast it, which, for me, is the best way to do it.
But not hours ahead.
Basically, this, it's ready to roll, so now you would wanna put that into 425 degree oven.
Again, herbes de Provence, herbes de Provence, herb from Provence is similar to Italian seasoning.
This is a mixture of thyme, there is thyme, there is oregano, there is even the tiny blue flowers that we call lavender, all herb which grows in the south of France or in Italy.
So, that would go into the oven at 425 degree and I would cook it for approximately 45 minute or so.
(bright music) And now what I wanna show you, this is a beautiful piece of veal.
As you can see, this is what we call the top round.
That is the larger muscle of the back leg.
This is very, very lean.
It's all clean.
And this is the best, in my opinion, or one of the best of the meat to do scaloppine.
That is little slice that you salt in one way or the other.
For example, you could do a roast with that, but the roast would tend to be dry.
Don't braise it.
You will have to cook it very carefully and not too much because it's a very lean piece of meat, so the roast could get dry, although it could be done well if you know how to do it.
But scaloppine would be the great thing to do.
Veal is basically young beef, and as you can see, the color of the meat is pale pink, and that because the the animal have not grazed there, so there is a lack of iron in it.
And because of lack of iron, the myoglobin that is the muscle tissue has not permeated through the meat yet.
If that animal start grazing and so forth, the meat will turn redder in color.
This is veal, and the veal is usually done medium, at least.
Now, you cut that meat against the grain.
You can see, maybe, the grain of the meat here, which goes this way.
So, you always cut against the grain to break it.
So, you put your hand there, and with a long knife like this, you can cut very large.
That would be what we call an escalope in front.
Now, more in the Italian tradition, if you want, you would cook what you call a small scaloppine like this serving three or four per person, for example.
Just saute and finish with a little bit of lemon juice, olive oil, garlic, and so forth.
That would be terrific.
Now, another thing that we do with this very often is a Wiener schnitzel.
Wiener schnitzel in German, in French, escalope de veau viennoise, which means Vienna style, that is Austrian style, which is a breaded piece of veal.
And very often, you can use any type of piece.
For example, I could use that piece and pound it.
But let's say you have a piece of veal left which is kind of an odd shape, like this.
Well, you could use this for that also by, again, you want to trim it of any type of fiber that you have on top.
And that piece of meat, now, I could butterfly it, let's say.
So, I would cut it this way and open it.
You see, it doesn't matter by the time you're going to pound it.
No one will see that.
So, I have butterfly, and that I could pound.
And let's say I wanna do a large one and I have another piece left like this.
Well I can pound this this way.
Now, there is different way of pounding it.
You can use one of those pounder.
Check the classic one.
You can see there is teeth, here.
And that, basically, as it goes through the meat, it break the fiber and tenderize the meat.
It is not necessary, in my opinion, when you have a good piece of meat like this.
So, what we use is more a type of flat thing like that to pound it.
Now, if I pound that directly on the board like this, it's going to crush the meat, why?
Because the meat doesn't slide.
So, to help the meat slide, we put a little bit of water on the board and even on my thing, and I start pounding it.
(pounder tapping) And that's fine with it like this.
This way.
(pounder tapping) Running my meat together.
You see, this is particularly good when you do other piece of meat that you don't really know what to do with it.
At that point, you can see there is a hole in the center, there, but it really doesn't matter.
Another way of pounding it, too, which is good, is to use, instead of the water, a piece of plastic wrap like this.
If you use a piece of plastic wrap like this, you put your meat directly on top, another piece of plastic wrap on top, and that replace the water, make it slide.
(pounder tapping) And that work very well.
Actually, it is really the preferred method now.
We used to put water when plastic wrap did not exist many years ago.
Now, we use this.
It has different advantage, too.
It doesn't splatter all over the place.
Let's say I wanna do a large one and I have that piece which is pounded quite thin, there.
Well, I can add it to this, let's say I add it here, (pounder tapping) and pound the whole thing together, like that.
So, you see I could have a meat of different type, or different little pieces of meat and do something with it.
When I finish this, I will trim it a little bit so that it's at approximately the same shape.
And I would have a novel shape here and I have a fairly large piece of meat.
Even though there is a little hole in the middle, it will disappear.
And even though there is a little piece of meat glued to it, you won't see it.
You won't see it, it won't curl up because there is no sinew and it has been pounded.
Now, what you would want to do when you bread it is to season it with a tiny bit of salt and freshly ground pepper.
And then we wanna dip it flour, then after in what we call an anglaise, which is an egg that you break, you put a little bit of water in that eggs, in that mixture, here.
You put a dash of salt and a dash of pepper, and sometime people put a little bit of oil in there.
I don't think it's necessary.
I don't put the oil.
(fork clinking) And of course, then, the breadcrumb.
Now, the breadcrumb, it's very important for me to use the right one.
I have a slice of bread here.
I have several slice of bread, right here.
And as you can see, those are regular white bread which have been trimmed.
You don't have to trim it, but if you want a real white breadcrumb, then you trim it.
Now, a slice of bread like that I put in the food processor will give me approximately half a cup of dried breadcrumb, half a cup of fresh breadcrumb, rather.
Big, big difference between fresh and dry bread crumb.
(food processor whirring) Now, it is not that you cannot choose dry bread crumb, it's just that you have to be aware of it.
When you use dry bread crumb, you use about five times the amount of bread.
So, what happen when you use fresh breadcrumb like that, you put that into a skillet with a little bit of butter, a dash of oil.
You saute it on each side.
It's nice brown.
Because of the bread being fresh like this, it does not even absorb the the fat in there.
It doesn't even absorb the fat in the skillet, so the finished product is very moist and delicate.
And you say, "That was great!"
Next time you do it, you use dry breadcrumb.
What happen, the dry bread can absorb the butter, absorb the oil.
You put more butter, you put more oil, and you finish it and say, "I did it just like the last time.
But this time, point I have a thick outside.
It's far to be as good as the last time."
Yeah, this time you have used dry breadcrumb, and the time before, fresh ones.
So, it does make a big difference.
So, what we do, we dip it in there again.
See, you could have something a bit wider than what I have here because I have a pretty, and you want to take off the excess a little bit, and that goes into our breadcrumb, here.
Dry breadcrumb, I mean, fresh breadcrumb.
Now, in that breadcrumb, for example, you could put a little bit of Parmesan cheese, which is done in Italy.
You could put some herbs in it.
You could put different type of things.
But basically, we keep it with bread like this.
You put a certain amount.
You don't want to have too much, but you want to cover each side.
And we pound it gently like this.
Okay.
And you can mark it with the back of your knife.
This is purely for decoration, usually.
And if you saute it, it should show at the end.
And basically, you're ready to cook this.
As you can see, now, the hole or whatever you add in it, your hole in the center, you don't see that anymore.
That will saute nicely without curling up, without moving, because, as I say, it has been pounded.
So, this is the way you prepare your Wiener schnitzel or your veau viennoise.
Now, this, of course, you can do a couple of days ahead and keep it in the refrigerator covered and saute when you're ready to saute.
As I say, a little piece of butter, a dash of oil to prevent the butter from burning, and about two and a half minutes, two minutes on each side for that type of thing, and it'd be perfect.
It goes to about that type of thing.
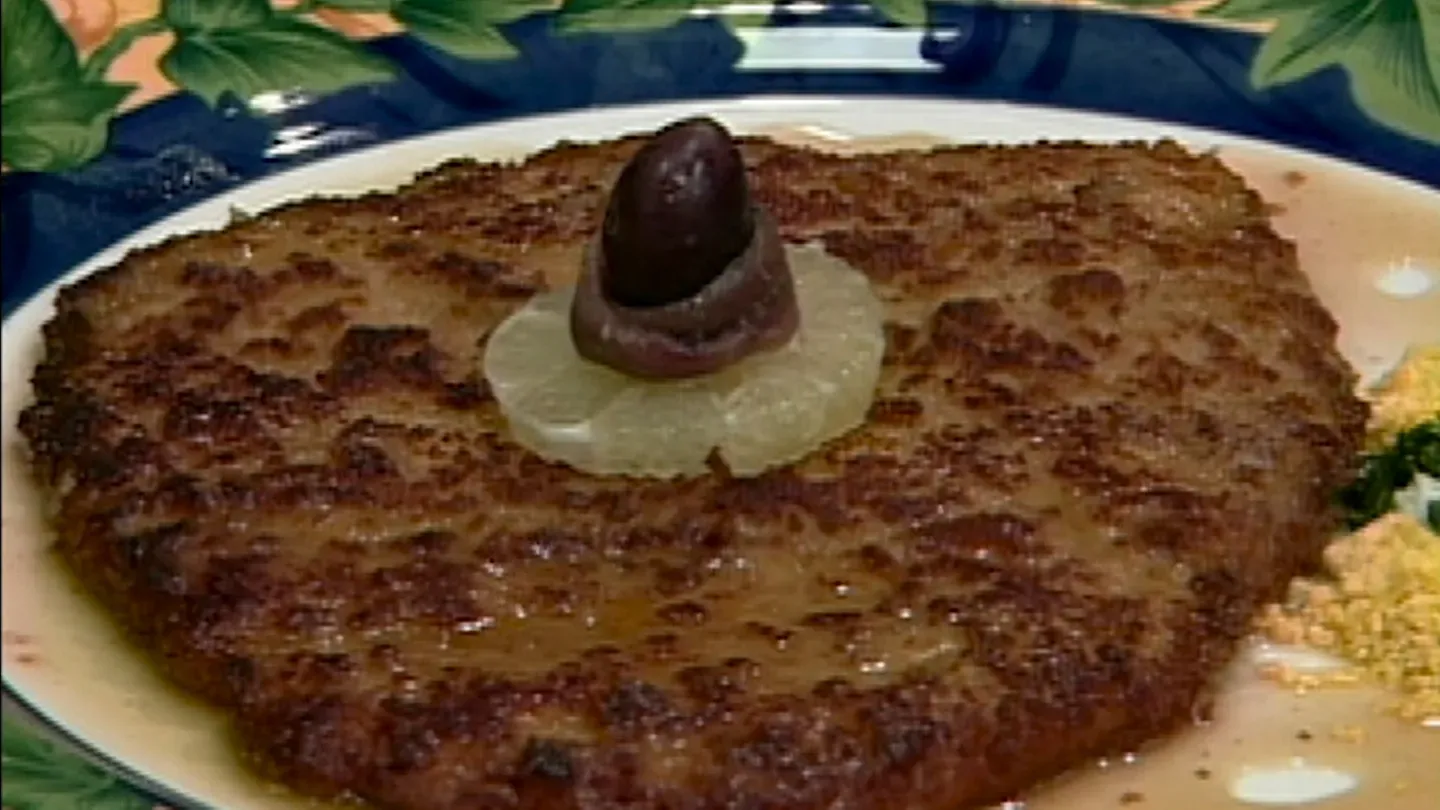
This one is rounder, and the classic garnish for that is a garnish of different type that I have here.
As you can see, I have capers, I have parsley, I have lemon, I have hard-cooked eggs divided within the yolk and the white.
I have olive and I have anchovy filet.
All of that goes into the classic garnish.
First, we put either a slice, you can use a slice of lemon this way, or even the slice of lemon with the skin, as I have here, and one or the other is acceptable.
Conventionally, however, it is done this way.
So, I am going to use this.
On top of this, you put an olive.
I have a little black olive, here.
You roll it with an anchovy filet and you place it on top of it.
That the classic way.
That will go in the center of your scaloppine.
And now, the garnish here that you can have, we have a little bit of capers.
All of that goes well with it.
Then, let's put, you try to arrange your colors so that they look good.
We put a little bit of egg white, here.
If you have more time, you can really arrange it a little more artfully than what I am going to do here.
Maybe the parsley after.
You can have another type of herb if you don't want to put parsley, but conventionally, again, it's parsley.
And then, the yolk at the end.
You have that type of garnish.
A little bit of lemon juice on top.
If you have a bit of melted butter, usually a bit of the veal demi-glace, which is a reduction from the bone of the veal, here, you put around.
You have a little bit of beurre noisette, that is a bit of melted butter on tip, and you are ready to eat.
(bright music) There are obviously many more technique you can learn to make yourself a better cook, but I hope I have encouraged you to pick up a few more skill in the kitchen.
Thank you for joining me, and happy cooking!


Support for PBS provided by: