E25 | Westford Historic Renovation | Mural on the Wall
Season 46 Episode 25 | 23m 42sVideo has Closed Captions
With the build coming to an end, Kevin checks in with the team to see what's left.
Final installs are wrapping up at the Westford House! Kevin O'Connor tours painted rooms, restored stairs, and meets Cathryn Blackwell on stained glass, Brian Bilo on a custom vanity, Lisa C. Mair on a mural, Dan McCarthy on solar, Heath Eastman on lighting, and Charlie Silva finishing the garage door as the project nears completion.
Problems with Closed Captions? Closed Captioning Feedback
Problems with Closed Captions? Closed Captioning Feedback
Funding for THIS OLD HOUSE is provided by The Home Depot and Renewal By Andersen.
Support provided by:

E25 | Westford Historic Renovation | Mural on the Wall
Season 46 Episode 25 | 23m 42sVideo has Closed Captions
Final installs are wrapping up at the Westford House! Kevin O'Connor tours painted rooms, restored stairs, and meets Cathryn Blackwell on stained glass, Brian Bilo on a custom vanity, Lisa C. Mair on a mural, Dan McCarthy on solar, Heath Eastman on lighting, and Charlie Silva finishing the garage door as the project nears completion.
Problems with Closed Captions? Closed Captioning Feedback
How to Watch This Old House
This Old House is available to stream on pbs.org and the free PBS App, available on iPhone, Apple TV, Android TV, Android smartphones, Amazon Fire TV, Amazon Fire Tablet, Roku, Samsung Smart TV, and Vizio.
Keep Exploring

This Old House Insider Newsletter
Get This Old House exclusive stories, tips, and behind-the-scenes information delivered right to your inbox every month.Providing Support for PBS.org
Learn Moreabout PBS online sponsorshipKevin: Today on "This Old House," I have come to Perkinsville, Vermont, to meet with an artist who's painting us something very special for our dining room.
Then the ground-mounted solar field is ready for install.
Heath: And it's finally time to see the light here in Westford.
Kevin: Oh, my goodness.
Heath: Look at that.
♪♪ Man: Ahh.
That's it.
♪♪ ♪♪ ♪♪ ♪♪ Kevin: Hey there.
I'm Kevin O'Connor, and welcome back to "This Old House" and to the final project of this season, our 1893 colonial revival here in Westford, Massachusetts.
And we are down to just the last week, which is why all the interior finishes are well underway.
Mauro and his crew have handled the paint here on the second-floor hallway, so we've got a beige out here in the hallway, but we've got bolder colors in the bedrooms that are adjacent.
Trim carpenters have got our casings up as well as the crown molding.
And check out that egg and dart detail just below it.
Really nice touch right there.
Really celebrates this second-floor hallway.
And a little later today, Heath is actually going to keep the party going by installing an antique brass and crystal chandelier to light up this whole staircase, which was one of the few things that survived in this house after a fire about eight years ago, and the homeowners were adamant about restoring it.
So things like the balusters, these were all sent off-site so that the lead paint that was on them could be stripped off.
The handrails were actually stripped in place right here, back to bare wood.
This is poplar.
Mauro's guys did a great job staining it to match what they think was originally here.
And one of the things we know was originally here were these oak treads on the staircase, also staved.
So sanded, restained, and all of the new oak flooring throughout the house?
This was made to match this.
That's a good job.
That's a nice touch.
Wainscot was stripped and repainted.
Nice job.
And check out the beautiful swoop of this top rail right here.
When you see it from this vantage point, you can tell why the homeowners were adamant on saving the central staircase.
It makes a statement.
So the trim is up here on the first floor.
Fluted side casings.
Check out the head casings right here.
These are original with the original carving.
Those were all cleaned up and put back in place.
We've got the double opening right here to what we're calling the front parlor.
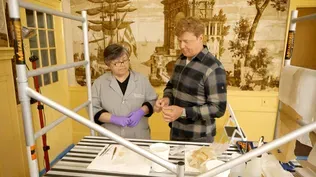
And, Cathryn.
Cathryn: Kevin, hi.
Kevin: Good to see you again.
Cathryn: Good to see you.
Kevin: So you have been our glass restoration expert for years.
We're glad to have you back.
Cathryn: Glad to be back.
Kevin: And you are fixing our glass shutters that we had.
Cathryn: Yeah.
Kevin: So when I showed up... Cathryn: Uh-huh.
Kevin: ...when we first came in the house, they were curved, like completely bowed.
Cathryn: Completely.
Kevin: We speculated ruined by the fire or the water damage.
Cathryn: Mm-hmm.
Kevin: Your assessment?
Cathryn: Gravity.
Kevin: Really?
Cathryn: Yeah.
I think the way they were stored upright let them bow down.
Kevin: Is that typical for a leaded glass window?
Cathryn: It's not typical for a leaded glass window, but these are copper-foil windows, so they're not as strong.
Kevin: Whoa.
What's the difference?
Cathryn: Well, the difference is instead of strips of lead going between each pieces of glass, it's strips of copper foil that have an adhesive.
And that adhesive holds on to the glass.
And when you solder it together, it becomes one.
Kevin: So, if I remember our previous lessons correctly, this is the lead channel right here, the U-channel.
Glass slips into it on all sides and then you solder.
What's the difference with the foil?
Cathryn: The difference is the foil is a tape, so the tape gets wrapped around the perimeter of the glass.
Kevin: Mm-hmm.
Cathryn: All pieces.
And then once it's pushed together, it can be soldered along the joint that gets created.
Kevin: And why the different techniques?
Cathryn: So much lighter.
Feel it?
Kevin: I do.
Yeah.
I mean, this one here is like twice as heavy.
Cathryn: Twice as heavy.
So this right here is excellent for this kind of application.
The first time it was used was by Tiffany when he was making his lampshades because he needed them to be lighter than lead would allow.
Kevin: So a deliberate choice to make these windows lighter.
And why are we trying to make these windows lighter?
Cathryn: Because they're going to be installed in this window and they're going to open up, and we don't want them to be so heavy that they're pulling on the hinges all the time.
Kevin: Nice.
So what is your process for joining the individual pieces of glass?
Cathryn: Well, they all get reassembled.
And then once I have them in the right order and the right place, then I go ahead and solder them.
Kevin: And then solder being solder, it just finds its spot?
Cathryn: Yeah.
Yeah.
It finds its spot.
It holds everything together really beautifully.
Kevin: That's terrific.
Cathryn: Yeah, it's pretty good.
Kevin: So, what do you think of our windows?
You approve?
Cathryn: I think they're beautiful.
I don't know who made them, but they did a fantastic job.
I'm happy they didn't get disposed of.
Kevin: Well, we're glad you like them.
And we're very thankful that you're here to restore them.
And those are actually being hung by Kevin.
Kevin, thank you again for your hard work right there.
Kevin #2: You're welcome, Kevin.
Kevin: And, Cathryn, always great to see you.
Thanks for coming.
Cathryn: Good to see you.
Kevin: Alright.
Cathryn: Have a good day.
Kevin: So we call this the front parlor.
And they call this the back parlor right here.
Now, there were shutters in this room as well.
You can see them right here.
Our homeowners tell us not original to the house.
They think circa 1980 or so, but they weren't damaged in the fire, so they did not need to be restored or rebuilt.
They will be rehung, one of the folding panels right here, two in this window, another one right here, so that the bay will have all that beautiful glass complimenting one of our window seats, one of three that have been rebuilt in this house thanks to Mr. Silva and Kevin.
Two more shutters in this window right here.
And then on this wall, there's going to be -- Well, there is an original built-in bookcase.
Charlie's got about a week to finish that right there.
And then we have the fireplace.
So, like the one upstairs, a lot of work went into restoring this.
The tiles on the surround are original.
They were able to clean these up, make some repairs and put them back in place.
But also like upstairs, the hearth tiles, they were too far gone, so they found a match.
They laid those in, and I would say that they did a pretty good job right there.
Speaking of tile, we've got our tile down in our bathrooms and a whole lot more.
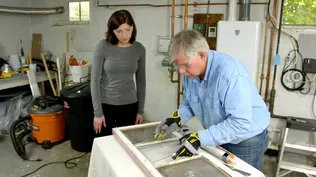
Hey, Brian, good to see you again.
Brian: Hey, Kevin.
Kevin: Last time I was with you, you were in rough-in.
You've taken it a long way.
Brian: We have.
Kevin: So they're going with a blue theme.
We got large tiles.
Looks like quartz.
Blue and white matches your wallpaper.
And the clawfoot tub.
Brian: Yeah.
Clawfoot tub with a bright blue finish, satin brass fixture and claw feet to match.
Kevin: Makes a statement.
Alright.
So they're going with the antique dresser turned into vanity.
Where'd this come from?
Brian: It came from a local artisan's who already converted it into a vanity for us.
Kevin: So part of the conversion is taking out that center space, flanking drawers left and right.
That gives us room for plumbing?
Brian: That's correct.
Kevin: Alright.
Brian: And we were lucky enough that they brought it to our attention so that we were able to rough the water and the drain line up higher.
Kevin: Oh, does that give you clearance for this?
Brian: It does.
You can see we don't lose the bottom drawer.
Kevin: That is nice.
Okay.
Brian: Yeah.
Kevin: So more storage, which you often lose with these things because sometimes, I mean, even the sink helps you, right?
Because sometimes the basin's down below.
Brian: That's correct.
But in this case, we have a vessel sink.
Kevin: Did he provide that as well?
Brian: It came as an ensemble.
And this sink did not have an overflow, which is typically that little hole in the back of the sink that prevents water from overflowing if the stopper is left down.
Kevin: Okay.
Brian: So we ended up installing a grid drain to prevent that from happening.
Kevin: Meaning you can never actually stop that drain right there.
Brian: That is correct.
Kevin: That makes it up to code.
Alright.
And how do you feel about wood next to water?
Brian: So because it is a vessel sink and they will be splashing, you know, it's always a good practice to apply a marine finish to the top.
Kevin: Which you did.
Brian: Which they did.
Kevin: Alright.
Well, I guess if you're going to go this route, you got all the tricks to make it work.
Good.
I'll leave you to it, but thanks, Brian.
Brian: Thanks, Kevin.
♪♪ Kevin: Recently, I traveled to Perkinsville, Vermont, to meet Lisa Curry Mair, who's painting us something very special for our dining room.
Lisa.
Lisa: Hi, Kevin.
Kevin: Nice to see you again.
Lisa: Good to see you, too.
Kevin: It's been a while, almost 10 years.
Right?
Lisa: Yeah.
Yeah.
Kevin: So last time I was here, you were working on a beautiful piece of artwork for our Belmont homeowners.
Canvas floor covering.
Lisa: Right.
Kevin: And so, by an amazing coincidence, our homeowners actually found you all on their own.
Lisa: Yeah.
They found me on my website, and they filled out a little form, and they put the address down, and I looked at the address and said, "No way."
That's the house directly across the street from where I grew up.
So I called them up and it was -- had to be.
Kevin: Literally across the street?
Lisa: Literally directly across the street.
Kevin: And then what they asked you for is sort of right in your lane, too.
Lisa: Yeah.
They wanted the historic elements, which is what I really like to focus on, doing the research of the town at the time the house was built.
Kevin: Right.
And it's already underway?
Lisa: It is.
It's upstairs and I can show you how it's coming along.
Kevin: Let's get to it.
Lisa: So here we are.
We've got the full-size canvas, and they're up on the wall so that I can paint them from my various steps where I create the background.
When I start with the sky, I need the whole panel exposed so that I can do all of the layers of the colors and shades of the sky.
And then I apply this thistle, which is a running motif that I'm going to have going all the way around the room.
Kevin: So directly inspired from the house, right?
Because we've got thistle carved into the house.
Original homeowner was Scottish, so he loves his thistle.
Lisa: That's right.
So then I moved the whole piece up so that it's at the height that it will actually be in the house.
This is where the chair rail is.
Kevin: Oh, right.
We have wainscoting below it.
Lisa: Right.
Kevin: Alright.
And your scene is coming together.
I recognize our house at least.
Lisa: Yep.
That's -- That's your house.
This is the road and bush school, the frost school.
This is my house back here.
Kevin: Ah, you worked yourself into it.
Lisa: That's me and my pony, Bluebell.
Kevin: Ah, that's terrific.
So how do you decide on the story and the theme and such?
Lisa: So it all starts with a bunch of research.
Kevin: Okay.
Where?
Lisa: I started at the Westford Historical Society, and they gave me a whole bunch of really good information, maps, and photographs.
Kevin: Map of the town, obviously.
Lisa: So, this is 1886.
It predates the house a little bit, but it gives me a lot of information about the significant buildings in the town.
Kevin: But then they give you old photographs.
Lisa: These are 1950s photographs.
Kevin: Wow, what an elegant-looking house right there.
That is awesome.
She is a beauty.
Oh, and then sketches?
Lisa: So then I go to a pen and ink sketch and I -- I show what I plan to have going on in the mural.
This one has a story that -- of fox hunting.
There's going to be a little hound that gets away and somebody chasing after the hound.
Um, so that's all played out on the sketches that I present to the customer.
So then I do a full-color sketch.
Kevin: [ Laughing ] Sketch?
This is a piece of artwork in and of itself.
Someone would love to have this.
Lisa: This is my road map.
Um, this is what I -- I give to the customer so they can see what I have in mind for the coloring and the lighting.
Kevin: Mm.
Lisa: And just the general content of it.
Kevin: The story comes to life.
So now we see the house.
But you've introduced the fox hunt, some of the town.
So you've taken this, got an approval.
It starts to go to this.
I know I interrupted you, but are you in a position to continue painting?
Lisa: I am.
I'm going to start painting on these trees right in this area.
Kevin: I'd love to see you work, if you will entertain us.
Lisa: Okay.
So this is a direct to metal acrylic house paint.
Kevin: And by direct to metal, you mean that a house painter who was painting a metal surface, this is what they would do.
Lisa: Yeah.
But the benefit of it is that it is very flexible.
So I'm just going to rough in the shape of the tree.
This is sort of a low shrub.
You get the general shape in.
And then I'm just going to apply a highlight on the light side.
The light's coming from the left on this one all the way around the room.
Kevin: So a piece of work like this is, I mean, truly custom.
You've made it for the homeowners with their scene, but you're even taking into account the light source that applies to that room.
Lisa: Right.
Um, so the -- the light will be coming from over here.
Kevin: From over there.
Bay window, right?
Lisa: Right.
Kevin: Just to your left.
Lisa: So that's why the light is coming this way on it.
And as I go around the room, the wall that has the cabinet on it will have the light directly on it.
Kevin: Directly on it, yeah.
Lisa: This is just a general start of -- of these trees, and I will go back in once they're dry and -- and do more detail work on them just to flesh them out a little bit more.
I am using a process and the -- the methods of Rufus Porter, who is an itinerant painter from -- in the mid 1800s, traveled around New England and beyond, um, painting murals on people's walls.
Kevin: Oh, that was like a thing, like a traveling mural painter?
Lisa: It was.
Yeah, there were a lot of them.
He was the -- the leader of the pack, so to speak.
Kevin: How did you come across him?
Lisa: I just -- I had always been following him, and he's a cousin of mine, so... Kevin: Wait, you're actually related to Rufus?
Lisa: I am.
He's a third cousin six times removed, I believe.
Kevin: Wow, so this was, like, really meant to be.
The kind of connection that you have to the house, the scene, and now the style are quite strong.
Lisa: It's so fun.
I can't wait to see it all up on the wall.
Kevin: Neither can we.
♪♪ Hey, Lisa.
Lisa: Hey, Kevin.
Kevin: Good to see you again.
Lisa: Good to see you, too.
Kevin: Been a couple of weeks since chilly Vermont.
And you brought help.
Lisa: I did.
I brought Charlie along with me to hang this thing.
Charlie: Nice to see you.
Kevin: Charlie, nice to meet you.
So, our dining room -- You told us that you were going to start with the main panel, I think, right?
Lisa: Yeah.
Kevin: What is the process for prepping the wall and then installing the canvas?
Lisa: So, we've pasted it once, and we let it dry, and then we paste it again.
And then we hold the canvas up to it and smoosh it up against the wall.
Kevin: Heavy canvas, a lot of paste.
Lisa: Yes.
Kevin: Okay.
And then when it comes to positioning, I see you've actually shot a laser around the whole perimeter.
Lisa: Yep.
We have a laser showing us where the top of those thistles go.
Kevin: Alright, well, I'm gonna excuse myself because I kind of want to be surprised with the whole finished product, so... Lisa: Yep.
Kevin: Can't wait to see it too.
Thank you.
Lisa: Thank you.
♪♪ ♪♪ So, with this, we're just trying to get all the bubbles out from behind so that it's nice and flat to the wall.
♪♪ ♪♪ This tape is put here to act as a guide for us.
This is roughly where the cut mark should be.
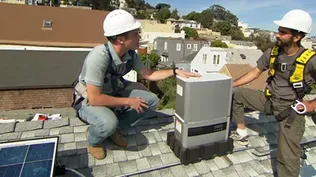
♪♪ Kevin: Our homeowners called for solar on this project, and you may recall that the roof on the main house, well, it's a hip.
It has dormers and it has a widow's walk.
So the panels could not go up there.
And that's why Dan McCarthy, our solar installer, has given us a ground-mounted system.
Dan, good to see you again.
Dan: Good to see you.
Kevin: So, big system, well underway.
And last time I was with you, you were sinking screws into the ground.
Right?
Six-foot-long galvi screws.
Dan: Yeah, we sure were.
So the way those work, these, uh, feet are sticking about six inches out of the ground here.
And we have three set screws which hold our uprights in place.
And, uh, the whole system is built right off that.
Kevin: And it is a big system.
So tell me about it.
Dan: Yeah, it's going to be an 18.72-kilowatt DC system and a 13.8-kilowatt AC system.
Kevin: And how many panels do we need to get that?
Dan: It's going to be a total of 36 modules.
Kevin: Wow.
And they're big panels.
Dan: Yeah they are.
They're, uh, 520 watts each.
Kevin: So in layman's terms, when you talk about kilowatts like that, what does that mean to the homeowner in terms of, you know, his production?
Dan: They should be producing somewhere in the range of 18,600 kilowatt hours a year, which is what you see on your bill.
And that'll cover about 99% of their bill.
Kevin: So almost everything for the main house?
Dan: Absolutely.
Kevin: Impressive because his heating and cooling system is all electric.
Dan: It is.
Kevin: Alright.
So when these things go on a roof, we'll see the inverter sometimes up there or just underneath the roof or down in the basement.
What do you do when it's ground-mounted?
Dan: Uh, in this case, we're running the power from this array, uh, DC, all the way back to the pedestal over there.
And at that point, we'll convert it from DC to AC power.
And then whatever the house and the carriage house are demanding will draw from that pedestal.
Kevin: So inverter's over there.
So we ship from here to there.
And then from there we can go house or to carriage house.
Dan: Sure can.
Kevin: Very nice.
Well, listen, it's a big system.
You got a lot of work left to do, but we appreciate you guys doing it for us.
Dan: Thank you so much.
Kevin: Thank you, Dan.
♪♪ So even with all of the snow on the ground and the cold temperatures outside, Mauro still has some painting here on the front portico.
At the base of the columns and up top, there is some new trim that needs paint.
The front of the porch has got some trim that needs paint.
We also have to get a second coat on the beadboard, so Charlie has been kind enough to tarp the whole area.
He's also pumping in some heat so that we get the right temperature and, Heath, I guess you are a lucky recipient of the warm temperatures in here.
Heath: Listen, I'm happy to take advantage of Mauro's heat out here.
Kevin: Oh, you deserve it at this point of the job because you're the one running around like crazy, getting everything done.
Heath: But, you know, this is honestly my favorite part.
This is when you get to do all the finish work and really see things kind of come together.
Kevin: Very nice.
Heath: So we just got back from meeting Emily at the store where she ordered this light for the portico.
So I'm going to finish getting this tied in, and then I've got to head inside.
But I can use a hand if you're up for it.
Kevin: Yeah, if you need me inside, I'll meet you in there.
Heath: Alright.
See you there in a minute.
Kevin: See you in a bit.
♪♪ Heath: And we try to do our best to make the wire blend in as much as possible.
So next, I'm going to install the ground wire following the same path as the power wire.
And then I'll finish getting the wires up into the junction box.
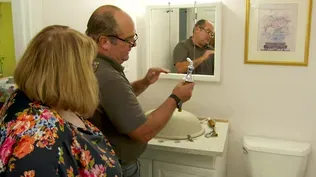
♪♪ ♪♪ So here inside it's time to hang the chandelier over the main staircase.
Now, Charlie and his guys were nice enough to build some staging over this so we can work safely.
And the first thing I want to do is install this fixture bar and get the canopy adjusted.
We'll just start by screwing one side in to get it started.
And next I'll do the other one.
So I just want to tuck these wires back up a little bit.
Just so they fit under the canopy.
And then give this a little turn and then see how we're fitting.
And we can see that's a little bit too high.
So I'm going to go ahead and unthread that and make that a little bit lower.
Maybe right about there.
That's pretty good.
So that's what we're looking for.
So my next step is to go ahead and tighten all of this up and make sure it's good and strong.
This makes it much easier when you're done trying to assemble.
When you hang the fixture, you go ahead and wire it.
That canopy will slide right up and sit just where you want.
Now that the canopy depth has been set, I'm going to go ahead and put the chain on.
And I'm actually going to use chain pliers to open up the links instead of trying to twist them with a couple of screwdrivers.
Okay.
So... That is my first link on.
And I'm just going to tighten that back up.
And those just let me close that link back up like nothing happened.
Kevin: This is the two-man-job part here?
Heath: This is what I need a hand with, Kevin.
Kevin: What are we looking at?
Heath: So this is a light fixture, an antique light fixture that was restored in New Hampshire.
So the company actually rewired the whole thing, and we got to check that out.
But then they went through and polished all the brass, cleaned all the crystal, made any repairs necessary.
So I haven't had a chance to see the final product.
So this is it.
Kevin: So this is a reveal for both of us?
Heath: This is it.
Kevin: Shall we?
Heath: [ Grunts ] Kevin: Ooh!
Oh, my goodness.
Heath: Look at that.
Kevin: That is awesome.
Heath: That's beautiful.
So we want to have this about two inches above this deck, Kevin, to get it to the height above the rail we're looking for.
Kevin: Okay.
Heath: Let's just try and hook it in place.
Kevin: Temporary.
Give it a look.
Heath: See what it looks like.
It's pretty close.
Kevin: That looks pretty good.
That looks really good.
You like?
Heath: I like.
Kevin: Okay.
Heath: I think it looks good.
Kevin: Yeah.
Heath: I'll get this excess chain out of the way.
I'll close this loop and then we can go ahead and wire it.
Yeah.
Perfect.
Alright.
Alright.
Wires are in place.
Let's go ahead and set that canopy, Kevin.
Kevin: Yep.
That canopy is a perfect fit to our new medallion, which looks awesome on the ceiling.
Heath: Did a great job.
Mauro installed this.
It looks good.
Kevin: Yeah.
And I'm just going to step back.
Man, that's going to be a great accent to the focal point, the center staircase.
Heath: I think it's gonna look amazing.
This is perfect.
Kevin: Nice job, Heath.
♪♪ Charlie, I love this.
What a big change down here, huh?
Charlie: It was great when we busted through the foundation.
Kevin: It was awesome.
Mark cutting through the stone with the big saw, using the granite elsewhere in the house.
Charlie: Made room for a garage.
Kevin: Homeowners are gonna love having this.
Charlie: You know, I was a little skeptical at first, but I really like it.
Kevin: Yeah.
Alright.
So how are you feeling?
One week to go.
A lot of work done, but still a lot more to do.
Charlie: I'm feeling great.
I think we're going to finish two days early.
Kevin: Ooh, I love the bravado.
Okay, well, until then, I'm Kevin O'Connor.
Charlie: And I'm Charlie Silva.
Kevin: For "This Old House" here in Westford, Massachusetts.
♪♪ Kevin: Next time on "This Old House"...
When we first arrived at this 1893 colonial revival in Westford, Massachusetts, it was down to the studs after a three-alarm fire and in desperate need of a restoration.
I love the fact that you can only see the beautiful stuff and ignore everything else.
[ Laughter ] After nine months, thousands of man-hours and some sweat equity, we celebrate this old house.


Support for PBS provided by:
Funding for THIS OLD HOUSE is provided by The Home Depot and Renewal By Andersen.