E24 | Westford Historic Renovation | A Family Affair
Season 46 Episode 24 | 23m 42sVideo has Closed Captions
Kevin heads to Williamson College of the Trades to hear how some graduates are doing.
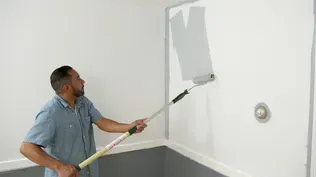
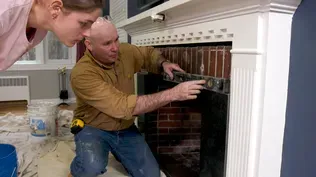
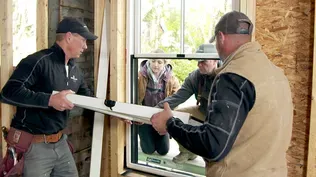
Kevin O'Connor checks out the restored wainscoting, head casings, and bay windows. Upstairs, Mauro Henrique teaches the homeowners how to paint a room evenly. Kevin meets tile setter Mike O'Neil, who restores fireplace tiles and repairs a damaged face piece. At Williamson Trade School, he meets the grads. Then Kevin helps finish the media room bay window with Tom Silva and Kevin Rafferty.
Problems with Closed Captions? Closed Captioning Feedback
Problems with Closed Captions? Closed Captioning Feedback
Funding for THIS OLD HOUSE is provided by The Home Depot and Renewal By Andersen.
Support provided by:

E24 | Westford Historic Renovation | A Family Affair
Season 46 Episode 24 | 23m 42sVideo has Closed Captions
Kevin O'Connor checks out the restored wainscoting, head casings, and bay windows. Upstairs, Mauro Henrique teaches the homeowners how to paint a room evenly. Kevin meets tile setter Mike O'Neil, who restores fireplace tiles and repairs a damaged face piece. At Williamson Trade School, he meets the grads. Then Kevin helps finish the media room bay window with Tom Silva and Kevin Rafferty.
Problems with Closed Captions? Closed Captioning Feedback
How to Watch This Old House
This Old House is available to stream on pbs.org and the free PBS App, available on iPhone, Apple TV, Android TV, Android smartphones, Amazon Fire TV, Amazon Fire Tablet, Roku, Samsung Smart TV, and Vizio.
Keep Exploring

This Old House Insider Newsletter
Get This Old House exclusive stories, tips, and behind-the-scenes information delivered right to your inbox every month.Providing Support for PBS.org
Learn Moreabout PBS online sponsorshipKevin: Today... Mauro: All painting is a family affair.
Brushes and rollers for everyone.
Tom: We're building a custom window bench to match the one that was destroyed by the fire.
Kevin: A few years ago we brought you a story about a post-secondary trade school.
Well, today I'm going back to celebrate their commencement.
♪♪ ♪♪ Man: Ahh.
That's it.
♪♪ ♪♪ Kevin: Hey, there I'm Kevin O'Connor, and welcome back to "This Old House" and to our project here in Westford, Massachusetts, where it is chilly outside.
We've got snow on the ground and low temperatures, but fortunately, things are heating up here on the inside.
And literally heating up because Charlie is pumping hot air into the project to keep all of the trades going.
Now, you may recall the house was built back in 1893 by a wool merchant as a wedding gift for his son.
Not so bad, but that means that the house is filled with some great 19th century charm.
One of my favorites is the window seat here to the left of the central staircase.
You don't see those much anymore.
Board and plaster are up, which means the trim guys have been hard at it.
And you can see what they did right here between the base and the top cap.
We've got about 10 inches right there, new plinths and some new fluted side casings to match what was here.
But look at this.
The original head casings with those carvings.
Those could be saved, and they've been all cleaned up and put back in place.
We were also able to save the wainscoting that was here.
That was all stripped.
That's going to be a great look.
More of those carved head casings.
All where they should be.
In here, we've got the new dining room.
Hey, Kevin.
Kevin R.: Hey, Kevin.
What's up?
Kevin: Not much.
How are you doing?
Kevin R.: Good.
Kevin: We've got some new floors going down and we've got a bay window here, another one just above it on the second floor.
And so window benches are going in.
Kevin's got this one.
Tommy's got the one upstairs.
This room leads into the kitchen.
The cabinets have been delivered.
They are pre-painted.
This is a soft green right there.
And they're primarily just base cabinets in here.
Homeowners wanted these upper walls not obstructed.
So these are going to be the workhorses.
There will be an upper cabinet here and an upper cabinet here flanking the three windows over the sink.
But on this wall, we're going to have counters and stove and such.
No uppers there at all.
The refrigerator goes right here and behind it.
We have got our back entrance, and then our back staircase going up to the second and third floors.
And behind that we've got a full bath, which means we've got a shower down here on the first floor.
So this staircase right here, which is the focal point of the house, this required a lot of work to save it and bring it back.
Everything here was covered in lead paint.
No balusters down low, but we had balusters up here.
So newel post, balusters, wainscoting all had to be meticulously mitigated by Ron Pike and his guys.
That has been done.
And Charlie, uh, part of that process was to send the balusters out.
You got them back?
Charlie: We did.
Ron took them out, and he actually numbered them all for us so we know where they go.
Charlie: Oh, that's awesome.
Yeah.
I mean, how could you not save these, right?
Charlie: It's a must.
Save the entire stair, believe it or not, right?
All of the posts, the rails, the treads, and even the landings that we're standing on, they saved everything.
Kevin: It's pretty amazing.
How lucky are the homeowners?
And good for them to try to save all of it and bring it back.
Charlie: Well, this is one of the reasons they bought the house.
Kevin: Right?
So I see that the floors are down up here as well.
Right?
There's nice stuff.
Charlie: Yeah.
This is a rift and quartered white oak.
Kevin: Mm, beautiful.
Love that.
So you can see all the little details.
All those flecks pop.
Charlie: Yeah, and we know it was used in the house because right under your feet here, here's our white oak quartered and ripped floor.
Kevin: So the rest of the floor is throughout the house, damaged by the water, but not these, which is terrific.
Charlie: All of it was saved.
And as you can see here, this is random.
This is 2.5 inch and this is 3 inch.
And we have 4 inch in the house.
The homeowners really wanted a 5 and 6 inch.
I really pushed back on it because that doesn't belong in this house.
And it wasn't here before, as the evidence shows.
So let's just say we compromised to a 4 inch.
Kevin: It's part of the job, right?
Talking people out of their dreams?
Charlie: That's right.
Kevin: Well, listen, the white oak is a great choice and love the fact that it matches there.
So you got your work cut out ahead of you putting those in.
I'll leave you to it while I go check in on Mauro.
Charlie: Alright.
Kevin: Thank you, Charlie.
Hey, Mauro.
Mauro: Kevin.
Kevin: Look at you.
You got a new crew.
Hey, guys.
Emily: Hey.
Kevin: Alright.
Mauro: I got the whole family here helping.
Kevin: Putting the homeowners to work.
Mauro: Yup, protecting all the baseboards.
Kevin: Okay.
And so what is your sequence?
Mauro: Well, the good sequence is a good coat of primer on all the surfaces, and then we paint the ceiling.
We paint all the trim.
It's time to paint the walls.
Kevin: Alright.
Mauro: Although we have a coat on the baseboards, another one coat to go.
But I wanted to protect just to avoid any drips into the baseboards.
Kevin: Did you hear that, guys?
No drips.
Mauro: Zero drips, guys.
Zero drips.
Kevin: You got a good crew.
I'll leave you to it.
Mauro: Alright.
Kevin?
All right, guys, let's finish taping and we'll pick up the brushes and rollers, okay?
Emily: Awesome.
Alright.
Mauro: Alright, guys, now let's have some fun.
Alright, I need two of you to do the cutting lines and two to be rolling the walls.
Dianne: I think we'll do the rolling and let the guys do the cutting.
Mauro: Very smart move.
Smart woman.
Ethan, I'm going to handle this to you.
Alright, so you're going to start and I'm going to pick up that, and I'll show you how I do it.
Ethan: Great.
Mauro: Alright.
You go nice and easy.
So try not to put any paint on the crown.
Charles: How many times do you have to put paint on the brush?
Mauro: Well, Charles, there's some very good questions?
But as soon as you start not seeing paint on the walls or on your brush, it's time to load up your brush again with some more paint and keep going.
Nice and steady hands, right there.
♪♪ Ethan: Hey, Mauro, I think I might have hit the crown by accident.
Mauro: Oh, I can see it from here.
Ethan: What do I do?
Mauro: Alright, that's not a problem.
That can happen anytime.
So every time we paint, one thing we care, right next to us is a wet rag.
This is a water-based paint.
All you have to do is wipe that off as soon as you can before it dries.
Ethan: Okay, that's easy.
Mauro: But don't mess it up again.
Ethan: [ Laughs ] ♪♪ Mauro: Now, Dianne and Emily, we have the small rollers and we have big rollers.
Which one do you feel more comfortable?
Emily: I guess I'm going to do the big roller, right?
Dianne: Alright, The little one.
Mauro: Okay.
While we're doing this big roller here, Dianne, you can pick up this small one and you can go at the bottom.
You can go at the top.
And, Emily, I'll show you a good way to roll the wall.
Emily: Okay.
Mauro: Alright?
You're going to load up some paint on it.
Don't put a lot of paint.
So all you have to do, um, is go, like, you're going to spread the paint just like that, just like a W form or anything like that.
And then you're going to spread it around all the walls.
Emily: Okay.
Mauro: Nice and easy, and try to cover everything.
If you miss a spot, go back and you can do it again.
Emily: Okay.
Mauro: Just take some of the excess out.
Alright, you're good to go.
♪♪ A little more like this so you can see what you're doing also.
♪♪ Beautiful.
Dianne: Okay.
Mauro: Well, guys, it looks really nice.
I like for you guys to finish all the walls.
Keep up with the good work.
I got another project to do.
Ethan: Thanks, Mauro.
♪♪ Kevin: Like the balusters and all of the original details in this house, the homeowners want to save all of it.
And that includes the tile around two fireplaces.
Now, we did a little bit of investigative work, and we were able to find the manufacturer's name on the back of the tile.
Looks like Providential Tile Works from Trenton, new Jersey.
We looked them up.
Company started business in 1885, but unfortunately they went out of business in 1913.
So that means we can no longer get this tile, and we need some.
So that is a task that we're leaving to our tile installer, Mike O'Neil.
Mike, good to see you again.
Mike: Kevin, Nice seeing you.
Kevin: So, well, you got quite a dig here, right?
It looks like an archaeological site.
Mike: We have.
Kevin: So what can you tell me about what we got?
Mike: Well, we have this old 1800 tile that we took off the face of the fireplace and the hearth of the fireplace.
Unfortunately, we don't have enough hearth tiles to do the new hearth, but we do have enough of the face tiles.
Kevin: So all of the empty spaces that I see right there, we're missing those tiles.
Mike: Correct.
Yes.
Kevin: What do we do about that?
Mike: Well, if you brought them some options.
Option one, two and three.
Kevin: Okay.
Mike: And the closest thing that we came to was this crackle finish tile here.
Here's the old tile.
Kevin: Well, that's a pretty good match right there.
Mike: Excellent match.
Kevin: Different size though.
Mike: Yeah.
So the company, the smallest one they can make, they're going to custom-make this for the customer.
It's going to be a 2-inch by 4-inch long piece, which would be closer to the size that it was originally.
Kevin: Okay, so a close approximation, about all we can do.
But you're telling me that on the face tiles around the surround -- I stole one of your pieces.
So let me put that back.
We've got everything we need there?
Mike: We do.
Kevin: And they look clean.
Mike: They look very clean, yeah.
Kevin: How'd you pull that off?
Mike: Well, we just sanded the backs of the tiles and cleaned them as best we could to get them ready to re-cement them back on.
And are we ready to do that?
Mike: We are.
We do have one tile that was broken already on the on the face of the fireplace.
Kevin: Oh, yeah.
So look at that.
So what do you do about that?
Mike: Well, we're going to take this piece and we're going to put a clear epoxy and we're going to bond that back together.
Kevin: Boy, I'd love to see you make that repair for us.
Mike: We will.
Kevin: Let's do it.
Mike: Well, Kevin, what we have is a ceramic tile that's got this ceramic backing.
And the top of this is a crazed -- the crazing in the glaze itself.
And what we're going to end up doing here is we have just a dry fit.
We can see what we have going on on the top of this tile right now.
Actually, it fits pretty good.
Kevin: It sure does.
Mike: It does, but you can see the back of the ceramic tile through the glaze at these three points here.
So what we're going to do is we're going to actually epoxy this piece back together.
Kevin: Yeah.
Mike: And then what we've done is we've mixed up some custom color epoxy to get as close as we could to the actual color of the tile.
Kevin: So your first epoxy, no color.
And we're never going to see it because it's between the two pieces?
Mike: Correct.
Kevin: And then this sort of on top?
Mike: On these three spots here to get rid of that white so we can make it look as new as possible.
Kevin: Go crazy.
Mike: Okay.
Kevin: Let's do your thing.
Mike: Alright.
Kevin: It's our beautiful little nozzle that mixes the two parts for us.
Mike: It does.
A and B comes together.
Just get a couple dabs here.
Basically, we're going to go as close as we can here to the bottom of this.
Sorry if it oozes out the bottom.
Kevin: But not the top, right?
So that's why you favored the bottom third.
Mike: We did.
Get that together now.
Get this even with the block.
So now we're good.
Nothing came out, in good shape.
We're ready to clamp.
Kevin: Alright.
Now we're going to check out your color match skills here.
Mike: So now we've got this color in here.
What this is is a hardener.
You just need a tiny, tiny bit of this.
Apply just a little dab off to the side.
What I do is take that razor knife and mix this up a little bit.
And that's going to activate the epoxy.
And that's going to activate it to dry.
I'm just going to take that and just apply that just a little bit over.
Kevin: Looks like you got the color right.
Mike: The color looks great.
We'll be able to buff the excess off after.
Kevin: So how long for the clear epoxy to set up versus the color?
Mike: So the clear epoxy will take about 5 or 10 minutes, so it will be strong enough to install.
And then the colored epoxy it's already starting to tack up.
It's already starting to dry.
And we'll actually hit that at the end with a little bit of acetone and a little bit of a like a triple X steel wool pad.
Kevin: So we let that set for a bit.
Mike: Yeah.
Kevin: Okay.
Can we begin the installation of the other pieces?
Mike: We can.
We can start at the very top and work our way down.
Kevin: Nice.
So what's your M.O.
here, Mike?
How do you tackle this?
Mike: I'm going to start with that big heavy tile right in the center.
Kevin: Yep.
Mike: We've got our center line right here.
We marked a little part of the tile so we know exactly where we have to put that first piece.
Kevin: And you're using for adhesion what?
Mike: Using a modified thinset.
Give it a little more flexibility.
Well, what we've done was we made a wooden template.
Allowed us to start our middle tile first without it sliding down, and then work to the left and to the right and down.
Kevin: Okay.
Mike: Alright, it's going to apply some of these wedge spaces just to hold up some of these tiles to where we need them to get to.
We're just going to back butter this tile again.
Alright, Kevin, so here's the tile that we repaired.
Kevin: Yeah, I mean, we're talking 130 years back in service.
Nothing wrong with that, right?
Mike: Not at all.
One little shim.
It should line up.
Kevin: That's awesome.
Homeowners are going to be thrilled.
They were dying to save these tiles, and you guys cleaned them up, back in place, install good as new.
Mike: Looking good.
Kevin: Nice job, Mike.
Thanks.
Appreciate it.
Mike: Thanks a lot.
♪♪ Kevin: A couple of years ago, we brought you a story about a post-secondary trade school.
Williamson College of the Trades takes young men from difficult backgrounds, and it gives them an education, teaches them a trade, and sends them out into the workforce with multiple job offers and no debt.
Well, recently I went back to the school to meet with some recent graduates who have started their careers and to celebrate some new graduates at this year's commencement.
Nice to meet you, George.
George: Nice to meet you also.
Kevin: You're an alum?
George: Yep.
Kevin: When did you graduate?
George: 2020.
Kevin: So, how did you find out about Williamson?
George: I went to Chester High about 10 minutes down the road.
One of the contractors, he was a painter.
He was there.
He would ask me, "Do you know where you want to go to school?"
And I knew I didn't want to go to college, but I knew I wanted to do something.
I didn't know what that was.
Kevin: Right.
George: And when I learned about Williamson and what they had to offer, so I felt as though Williamson would be the best place for me.
David: I live with my older brother and he said, well, what if I could -- what if there was a place that you could go to school for free?
I said, well, if a place like that existed, you know, it'd be stupid not to apply.
And he handed me the application.
He was like, "Well, here you go.
You're going to apply."
Um, so that's kind of how I learned about it and what led to, like, the decision of going into, like, horticulture.
George: Williamson College of the Trades is a great place to go.
They push you, everyone wants to see you succeed.
And there's alumni who come back to ensure that that's being instilled.
David: Leaving here, I had five different job offers, and like, so I was choosing where, you know, I thought I fit best.
George: I had two job offers working on boilers, troubleshooting and annual cleanings and stuff.
Kevin: You're employed now?
George: Yes, sir.
Tell me about that.
Where do you work?
What do you do?
George: My title is Production Technician three.
So with that, um, easiest way to explain that, I operate and maintain the major pieces of equipment that are used to generate electricity.
Kevin: And your day to day job?
George: It could be something as major as, uh, we're coming online to produce electricity, or we're isolating a piece of equipment so contractors and maintenance could work on it.
David: So I work for a company out of Perkasie, Pennsylvania, as a sales arborist and an in-house trainer.
Kevin: And so what is a sales arborist do?
David: So a client has a problem.
Go out, meet with them, and we talk about their trees.
And then I write them a proposal.
If everything checks out, then we get to send the crews out and complete the work.
Kevin: Do you think you were properly prepared by Williamson?
David: Between the education that we received, combined with the summer internships, gives a really well-rounded knowledge base going out into the world.
Kevin: Yeah.
Each year, Williamson puts on a career fair for its juniors and seniors.
David: Yeah, usually it's the employer who interviews several applicants, you know, has the pick of the litter and chooses them where it's it's kind of the exact opposite, where you must go and interview a bunch of companies, and then you get to choose which company you want to go with.
Kevin: Yeah, it's pretty nice.
Good feeling.
George: Absolutely.
Kevin: A degree.
George: Yep.
David: Three-year degree.
Kevin: Five job offers.
David: Yep.
Kevin: A job.
George: Not a job, a career.
♪♪ Woman: [ Announcing graduates ] Kevin: So never stop learning.
Be an apprentice for life.
[ Cheering ] [ Bell tolling ] ♪♪ Hey, Tommy.
Hey, Kevin.
Kevin R.: Hey, Kev.
Kevin: So you came up here to the second floor to give pops a hand?
Kevin R.: I did.
What a pleasure.
Kevin: So you got us pretty much to this point with the carcasses built?
Kevin R.: Yeah, I did.
Yesterday, we built the, uh, the three boxes out of birch ply, and I set them elevated, screwed them to the wall, and now we're doing the face frames.
Kevin: And so birch ply because we're going to see the inside of these storage, right?
Kevin R.: Yep.
They'll have three doors.
Each box has a door.
Kevin: Okay.
Very nice.
Tom: It's cabinet grade plywood, so that means that the 11 plies basically keep that plywood really true and the outside veneers are nice and smooth so you can paint it or stain it.
Kevin: And anything really true about the spot you're putting it in in this house?
Tom: The house when it was originally built was straight and true, but you know, it's 150 years old.
The house is crooked now and the walls were a little bit crooked.
So now we have to build the straight and true cabinet to the house.
Kevin: Okay, so we had window seats in this house originally when we got here, the old ones, right.
Tom: We're actually replicating what was there.
The panels open, and then also there'll be the three open benches.
Kevin: Well, I don't know if it's a three-man job, but I'm here to help.
Tom: Well, actually, because there's so much different cutting and stuff like that, we can always use the help.
I mean, if you want to be the cut man.
Kevin: Sure.
Tom: We'll mark the pieces.
You can cut them in sixteenths of an inch.
Can you handle it?
[ Chuckles ] Kevin: I'll try, I'll try.
Tom: So now we're going to add the face frames made up of horizontal pieces called rails and vertical pieces called styles.
And we're going to use one by flat stock to create those.
Kevin: Little long?
Tom: Just a taste.
♪♪ Kevin: Now try that one time.
Tom: Okay.
Keep that in nice and tight.
It's good here.
Kevin: So let me ask you, on these outside corners, you've got a miter, right?
That's about 22 degrees.
On the inside one, I mean, it's miter, but it's overlap.
Tom: So that's like a lap miter.
Basically it's a little bit stronger, but it's also a little bit forgiving.
So if this is off just a little bit, I don't have to worry about bisecting the angle.
I can fudge it in with this.
And I like to do that on inside corners on rooms and stuff like that.
It gives you more glue surface and less chance of that miter opening.
You know, this miter is basically bisected like that all the way down.
So, you know, over time that miter could open up, but it gives it a nice strong joint.
It's a lot more forgiving.
Kevin: So, Kevin, I saw you doing glue finished nails, but then every so often, a screw finished.
Kevin R.: Right.
Kevin: Why?
Kevin R.: Reason being was the rail was proud on the style and the reason why we want these to all line up perfect is so that when we go to put our inset molding in, that way we have a nice equal reveal around the whole inside of the panel.
Kevin: And this is all paint grade, so that screw hole is easy to hide.
Kevin R.: Yeah.
Mauro will take real good care of that.
Kevin: Nice.
Tom: Alright.
Our styles and rails are installed.
We're ready to install the molding, and we can start at the top.
♪♪ There you go.
We use glue when nailing into the end grain on plywood to create a stronger bond here than just nails alone.
The nails essentially act as a clamp until the glue dries.
♪♪ That looks good.
Yeah.
Kevin: Okay.
Tom: Alright, so, what we just finished up is putting a piece of finished trim around the edge, but we also face frame the top of all the plywood so you don't see the end grain or the veneers of the plywood.
Now in the back, you notice we added another piece of three quarter inch plywood and we left a little shelf right there.
That's so when we take a plywood to make the bench, so it'll go in like that.
Because if you didn't have it and someone big like you sits on there, that plywood would flex.
And this gives it a lot of strength so it won't flex when you're sitting on it.
Kevin: Somebody -- somebody big like me is going to try it out.
Tom: That's right.
Kevin: Got that other piece on the side.
So because this is a bench, a seat in front of windows, did you have to treat the glass differently.
Tom: We ordered tempered glass for all of the windows that have seats in front of them.
Kevin: Very nice, okay.
Charlie, what do you think?
Charlie: So, Kevin, that's beautiful, just like the one you did in the primary.
Kevin R.: Thank you.
Kevin: Yeah, I saw that one in there.
Beautiful.
And I'm told that the top is going to be treated with a cushion, right?
Kevin R.: Yeah.
Inch and a half cushion.
And it'll hide the hinge.
Kevin: Very nice.
okay.
So, Charlie, two weeks to go.
Charlie: Plenty of time.
And Mauro's in this room tomorrow.
Kevin: I love the confidence.
Tom: Yeah.
Hey, you got to push.
Kevin: Yeah.
Alright, well, until next time.
From our westward project, I'm Kevin O'Connor.
Kevin R.: I'm Kevin Rafferty.
Tom: I'm Tom Silva.
Charlie: And I'm Charlie Silva.
Kevin: For "This Old House."
Tom: Someone as big as me.
Kevin: What do you do?
You put an extra support for you?
Tom: Yeah.
I doubled up the support.
Don't you worry about it.
Watch out now.
Don't fall for the signs.
Kevin: Next time on "This Old House," I have come to Perkinsville, Vermont to meet with an artist who's painting has something very special for our dining room.
Man: Then the ground mounted solar field is ready for install.
Man #1: And it is a big system.
Man #2: So tell me about it.
Man #1: Yeah, it's going to be an 18.72kW DC system and a 13.8kW AC system.
Man: And it's finally time to see the light here in Westbrook.
Kevin: Oh, my goodness.
Man: Look at that.
Kevin: That's next time.


Support for PBS provided by:
Funding for THIS OLD HOUSE is provided by The Home Depot and Renewal By Andersen.