Indian Feast
1/2/2021 | 24m 12sVideo has Closed Captions
Host Julia Collin Davison cooks Murgh Makhani (Indian Butter Chicken).
Host Julia Collin Davison cooks Murgh Makhani (Indian Butter Chicken), ingredient expert Jack Bishop gives a primer on tomato products, and test cook Becky Hays makes Palak Dal (Spinach Dal with Cumin and Mustard Seeds).
Problems with Closed Captions? Closed Captioning Feedback
Problems with Closed Captions? Closed Captioning Feedback
America's Test Kitchen is presented by your local public television station.
Distributed nationally by American Public Television
Indian Feast
1/2/2021 | 24m 12sVideo has Closed Captions
Host Julia Collin Davison cooks Murgh Makhani (Indian Butter Chicken), ingredient expert Jack Bishop gives a primer on tomato products, and test cook Becky Hays makes Palak Dal (Spinach Dal with Cumin and Mustard Seeds).
Problems with Closed Captions? Closed Captioning Feedback
How to Watch America's Test Kitchen
America's Test Kitchen is available to stream on pbs.org and the free PBS App, available on iPhone, Apple TV, Android TV, Android smartphones, Amazon Fire TV, Amazon Fire Tablet, Roku, Samsung Smart TV, and Vizio.
Providing Support for PBS.org
Learn Moreabout PBS online sponsorship♪♪ ♪♪ ♪♪ ♪♪ ♪♪ ♪♪ ♪♪ -Welcome to "America's Test Kitchen" at home.
Today, I'm making murgh makhani, Jack will help us better understand tomato products, and Becky's making palak dal.
We've got a lot in store for you today, so stick around.
♪♪ -My daughter loves murgh makhani, which is butter chicken, because the sauce, it's tomato and cream.
It's fragrant but not spicy.
And I love it because it comes together in a snap.
So it's perfect for a midweek dinner.
Now, we always serve it over basmati rice, which I have cooking back there in the rice cooker.
And you got to start that first because the rice takes longer than the dish itself.
Alright.
Now we're gonna focus on the sauce first because it's all about the sauce.
First up, a nice big onion that we're just gonna chop.
I cut the tip off first and then I cut it in half through that root end.
And this is when I peel it.
I think it's easier to peel after you've cut it in half.
To cut an onion the easy way, you're gonna cut it into quarters, again, through that root end so the layers stay together.
And cutting towards but not through the root, we're gonna cut down.
And then I'm gonna tip it on its other side and do the same thing, and then you can simply slice down into a nice, fine chop.
Alright.
With that onion out of the way, it's time to focus on the ginger.
You want to use fresh ginger here, about 4 teaspoons.
And I have to say that prepping ginger is my least favorite kitchen task, but something that I found that makes it a bit easier is peeling with a spoon because the peels are really thin and you can just scrape it off.
Quick way to grate ginger is just using a rasp-style grater, and it's really easy once it's peeled.
Alright, so that's about 4 teaspoons.
I'm gonna put that right in the same bowl with the onions.
Next up, a serrano pepper, and this adds a little bit of spice and heat.
Of course, I always take out the seeds and ribs because those are the spiciest parts of the chili, but its fresh, grassy flavor is really important in the sauce.
And now I'm just gonna mince up the serrano.
Alright, into the bowl it goes.
Last but not least, some garlic and a good amount of garlic.
This is five nice-sized cloves.
So I'm just gonna trim the garlic, take the skins off by banging it against the side of my knife.
And then I love using a garlic press.
Just makes this whole process so easy.
And for this, having a perfect mince just isn't important.
So that is it for the vegetable prep for the sauce.
Now I'm gonna focus just on the few spices that really give the sauce its flavor.
We're only gonna use three spices.
Now, the first is garam masala -- a tablespoon.
And garam masala is a blend of spices.
Different brands taste differently.
And of course, there's lots of variations.
But anything you find in the supermarket will taste good here.
If you want to make your own garam masala, you can find a recipe for that on our website.
Next up, a teaspoon of ground coriander, 1/2 teaspoon of ground cumin.
Last but not least, we're gonna add 1/2 teaspoon of ground black pepper.
Veg prep is done.
The spices are measured out.
It's time to go to the stove.
Alright.
So we're gonna build this sauce in a simple sauce pan.
And I've already got 2 tablespoons of butter melting in here.
I'm gonna add those vegetables.
Takes only 8-10 minutes.
You want them to soften.
The onions are gonna get a little brown.
But that is crucial for flavor that you sweat those vegetables and they release their flavor into the pot before you add the liquid.
It's been about 10 minutes, and you can see that the onions have really softened and it started to brown around the edges.
And that is perfect.
Time to add those spices.
I'm gonna add them all at once.
And again, we're cooking over medium heat.
I'm gonna let these spices cook for about three minutes.
We really want to work their flavor into the vegetables and into the pot before we add the liquid.
It's been a couple of minutes.
You can really smell those spices.
They don't smell as raw.
They're a bit more muted.
And that's what we're looking for.
Now we're gonna add the liquid, and the liquid is just water.
A cup and a half of water.
And the tomato paste, 1/2 cup, which is more than one of those little cans.
So stock up on your tomato paste if you like this dish.
We're just gonna whisk this in.
And while I'm whisking, I'm feeling for any of those brown bits or that fond that formed around the edge of the pan.
You want to make sure you scrape that into the sauce because that's good flavor.
Alright.
So there are no lumps of tomato paste in there.
Now we're gonna add a little sugar.
This is a tablespoon of sugar and a teaspoon of table salt.
Return this to a simmer.
That happens pretty quickly.
There we go.
Now, I'm gonna turn the heat off and I'm gonna add a cup of cream.
So now I'm gonna use an immersion blender and put it in the pot to make the sauce as smooth as possible.
If you didn't have one of these, of course, you could transfer this to a blender and do the same thing.
But it can make a mess if you don't know what you're doing.
The one tip is to make sure these holes are always submerged, because if those holes are visible, sauce is gonna spit out all over the place.
Alright, so that's pretty good.
I'm gonna put this back on the heat, return it to a simmer, and then we're gonna whisk in just 2 more tablespoons of butter just for a little finish.
Again, this dish is known as butter chicken for a reason.
Okay, so the sauce is done.
What I'm gonna do is I'm gonna put the lid on to help keep it warm.
Now, I'm gonna turn the heat off.
Next up, the chicken.
With the sauce done, it's time to focus on the chicken.
And here I have 2 pounds of boneless, skinless chicken thighs.
Don't substitute chicken breasts here.
The thighs have much more flavor, and they stay tender as they sit in that sauce.
Even my daughter, who doesn't really like chicken thighs, likes them in this dish.
So no one is gonna complain.
You want to trim these.
Sometimes there's a lot to trim, some fat and gristle.
Sometimes there's nothing.
And these were pretty clean, and we're just gonna season them with a teaspoon of table salt.
Toss them around.
And now traditionally, the chicken is marinated in yogurt, which is delicious, but the yogurt actually does too good a job of marinating.
And it'll make this chicken a little on the mushy side.
So all we're gonna do is toss it with the yogurt, then cook it straightaway.
You just need 1/2 cup of nice, thick Greek yogurt.
The yogurt also will help the chicken brown in the oven, and that browning is pretty crucial for the flavor.
So you just want to toss the chicken around, make sure it's nice and evenly coated with the yogurt before you start cooking.
When it comes to cooking the chicken, we're gonna use the broiler because it's as close as we can get to a tandoor oven.
So the chicken gets a great char, which is awesome flavor.
But in our kitchen, we're just gonna use the broiler.
Just make sure the rack underneath the broiler is about 6 inches from the broiler element.
That way you get a good amount of browning.
Alright.
I'm gonna place this chicken on a wire rack, set over a rimmed baking sheet lined with foil.
And that is for easy cleanup because the foil will look like a mess.
These are ready for the broiler.
It's gonna take anywhere from 16 to 20 minutes.
I'm gonna flip them over halfway through so we get browning on both sides, and we're looking for a final temperature of 175 degrees.
Oh, these look good.
I know they might look a little burned if you've never made this before, but that is the level of char you're looking for.
That is good flavor.
So I'm just gonna flip these over and cook them on the second side.
Back into the oven another 10 minutes or so until they register 175 degrees.
Hu-hooo.
It smells good.
Now, I often find that the second side doesn't get as brown as the first side, but that's okay.
It's still gonna taste great.
So, again, we're looking for a temperature of 175 degrees.
We're good.
I'm gonna set these aside.
Let that chicken rest for five minutes before we cut it up.
And in the meantime, I'm gonna reheat the sauce over medium heat before serving.
The chicken has rested, and it's time to cut it up into bite-sized pieces.
And generally, you want to go for 3/4-inch pieces or so.
Basically, you want them to fit on a fork.
Alright.
So into the sauce, all the chicken will go.
[ Sighs ] Ohh.
Yup.
Last but not least, I'm gonna chop up a little cilantro and stir it in.
And I add about 2 tablespoons of cilantro in here, maybe a little extra for good luck.
Oh, goodness.
Here's that basmati rice, which is great 'cause it soaks up all the sauce.
Ah!
The moment I've been waiting for.
Mmm.
Oh, that's good with that little extra kick of heat.
If you want to make murgh makhani, remember two things -- First, you want to coat the chicken with yogurt, not marinate it.
And second, you want to throw that chicken under the broiler to cook so it's nice and blackened.
From "America's Test Kitchen" at home, a house-favorite recipe for murgh makhani.
♪♪ -Tomatoes are the culinary backbone of literally thousands of recipes.
Canned tomatoes are incredibly convenient, and I keep a wide variety in my pantry so that I can match the tomato product with the recipe.
Let's dig in and start with whole tomatoes.
So these are the closest to fresh.
They are literally whole tomatoes.
Yes.
That's why they're called whole tomatoes with the skins removed.
They're packed in juice, so they're fairly fresh-tasting.
They're not really cooked.
You can see here there's a nice, big -- That looks like a nice Roma tomato.
Don't buy the brands with basil and garlic.
You may be thinking, "Well, doesn't it make it better?"
It's like, "No," because you don't always want basil and garlic in everything.
These are really versatile.
So if you want to cut down on the number of tomato products you're buying, buy the whole tomatoes.
You can put them in the food processor and turn them into crushed tomatoes or you can use a pair of scissors and literally go in and snip the tomatoes to make diced tomatoes.
This is gonna take about two minutes.
I'm gonna shortcut it here.
Obviously, you're gonna get the scissors all the way deep down there.
But you can see, I've got a couple smaller pieces of tomato, and if you keep going, you can turn whole tomatoes into diced tomatoes.
Now, you may be thinking, "Okay, but why not just buy the diced tomatoes?"
The problem here or the challenge is that they are treated with a firming agent, calcium chloride, and they don't always break down.
So it's fine in a minestrone where I may want little bits and pieces of the tomato, but if I'm trying to turn diced tomatoes into a smooth sauce, I'm actually gonna get there faster with whole tomatoes than the diced because there's no calcium chloride there.
So if you insist on the diced tomatoes, I'm gonna suggest that rather than these sort of regular -- And look at the size of these chunks, they're pretty big.
You may not really want them that big -- is to look for a product named "Petite diced.'
This is much smaller.
They're gonna break down faster.
I should say, all of the brands here on the table are "Test Kitchen" favorites and top choices.
So far, all of these have been packed in juice.
When you move to crushed tomatoes, two things change.
One is they've been crushed.
So the skins have been removed and then literally crushed, but then they're enriched with puree.
So you see, these are a lot thicker, so a lot less fresh but also a lot smoother.
So if you're trying to make a sauce to go in, let's say a baked ziti, this may be the option that you want to use.
So you get a really thick, smooth sauce as quickly as possible.
Next up, we have tomato puree.
So skins are removed here as well as the seeds, and then it's cooked.
So it's absolutely smooth and really thick.
It doesn't have a lot of fresh tomato flavor.
We use it in long-cooked dishes.
So like a chili, for instance, where the tomato's a background flavor.
Really want a lot of that savory umami flavor.
It's cooked a long time, so it's not gonna be fresh anyway.
And really what we want is that savoriness.
Last but definitely not least, this may be my favorite thing that's here on the table.
It's tomato paste.
So think puree and now cook it a long, long, long time until you get rid of all of the water and this is what you're left with.
If you're going to buy this, please buy it in a tube.
It is so much more convenient than the cans because you can open up.
Say I need a tablespoon into a bowl, put the cap back on and throw it into the fridge.
You can use it again two days from now, two weeks from now, literally two months from now.
I use this in marinara sauces to add more umami.
Yeah, it's an umami bomb.
Anything where you want more savoriness, not necessarily more tomato flavor, a squirt of tomato paste -- Add it once you've cooked the aromatics, so the onions and garlic are already cooked, throw that in the pot.
Let that heat up with the fat for another minute and then go ahead and proceed with the recipe.
It's gonna taste better.
So the wonderful world of canned and tubed tomato products.
Now you know how to match which product with which recipe.
Enjoy your tomatoes.
♪♪ -I have a son who's allergic to nuts and peanuts, and at Easter time, I like to make him a chocolate bunny because if you buy them, sometimes they're processed in a facility or on shared equipment with nuts and peanuts.
I have got this antique bunny mold that my sister gave me, and it's for chocolate.
It has a front and a back and these little clips.
And I just microwaved some chocolate chips that I know are safe for him.
I just microwave about 30 seconds, stir it up till it's soft, and then you just flip this mold over.
Butter the inside.
I've tried oil.
Butter works better.
And you pour the chocolate in and then you let it set for a little bit and then I just stick it in the freezer to firm up the rest of the way.
And then when it's done, as this one is, take off the little clips.
And you pry it open.
And there he is, he's a little chocolate bunny.
If there's any little bits, you just trim those off and he's done.
Isn't he cute?
So that's my little hack for making your own chocolate bunny.
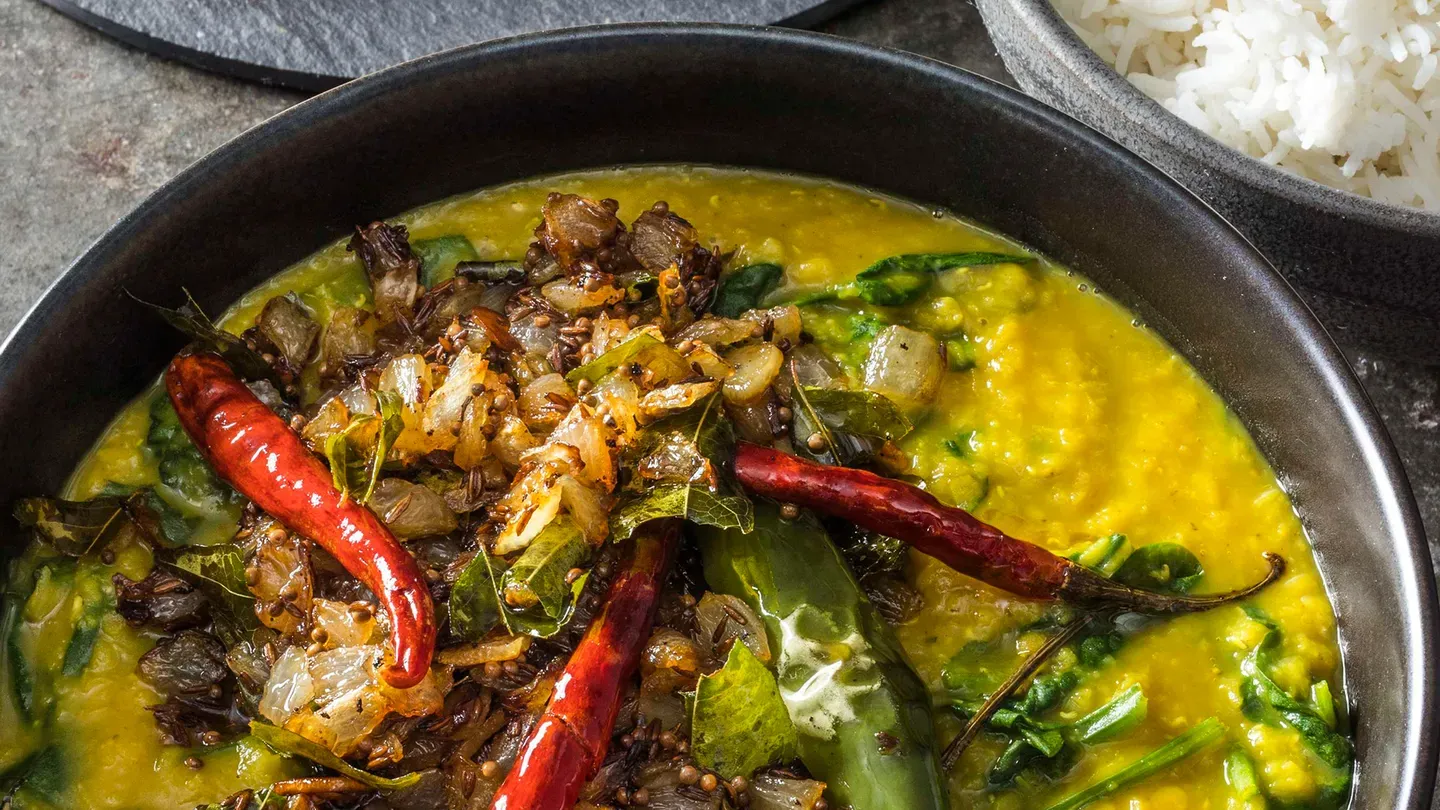
♪♪ -I absolutely love palak dal, and I make this recipe all the time.
It's satisfying, it's inexpensive, it's healthful, and it tastes absolutely amazing.
So it starts with dried red lentils, and we need 1 1/2 cups.
And when you're working with any kind of beans, it's always a good idea to spread them out on a white plate or a platter just so you can pick through them and check for any little stones or debris that might be there.
And I do occasionally find something.
So it is worth it to take a quick peek here.
It's just a tiny, little something.
We'll...throw that on the floor.
[ Laughs ] Okay, so these look good.
Let's take them over to the sink, and we're gonna give them a little rinse.
Whoop.
Lost a couple.
That's okay.
Alright.
So these guys can be a little bit dirty, so it's good to give them a nice little bath.
Now we'll put them into a saucepan.
Alright.
Now we'll flavor the lentils up with a couple of seasonings, starting with some fresh ginger.
The best way to peel ginger root is just to use a teaspoon, and you just kind of scrape the peel off.
So this way, there's no waste.
See, all I'm taking off is that papery peel.
Okay, so we need a tablespoon of this.
I'm going to grate it on the grater.
So a tablespoon of ginger into the pot.
And now I'm adding 4 1/2 cups of water.
So there's our water.
And then finally I'm going to add 3/4 teaspoon of turmeric.
Some cooks say that the turmeric adds health benefits.
Others say it's just used purely for its beautiful color.
It actually kind of matches the lentils there.
Ooh.
See?
Alright.
So our lentils are ready to go.
Let's take them over to the stovetop.
Now, a lot of cooks make their dal in a pressure cooker, but because we're using hulled lentils, they cook really fast.
These are gonna take only 18 to 20 minutes.
So we'll do them right on the stovetop.
I'm going to bring them up to a vigorous simmer, and then I'll stir them once or twice.
I like to serve the dal with basmati rice, so I'm going to go over here and start my rice cooker so everything will be ready at the same time.
This is the genius part of the recipe.
It's called a tadka, and it involves frying aromatics and whole spices in fat, and this extracts their fat-soluble flavors.
So you end up with this super aromatic, flavorful, and colorful topping for your dal.
Now, our tadka starts with an onion.
So I'm just gonna cut it in half first.
So, now, I'll chop the onion.
I'm looking for just sort of a medium dice here.
The next thing for our tadka is garlic.
I have six cloves I'm gonna slice up here.
Alright, there's our beautiful garlic.
And now I have a single serrano chili, and I'm just gonna half this lengthwise.
So this will be a nice, pretty addition to our tadka.
And I keep these in my freezer.
I just keep them in a plastic bag, and they freeze beautifully.
You could just take this straight out of the freezer and use it like that.
So...Ooh, that smells good.
[ Sniffs ] Now's when things start to smell good in the kitchen.
Okay, speaking of smelling good, these are curry leaves.
[ Sniffs ] Mmm, mmm.
They have a smoky, kind of citrusy aroma, and they're not related at all to curry powder.
They come from the curry tree, which is native to Southeast Asia.
So we need 15 of these.
14, 15.
[ Sniffs ] And I'm just gonna tear these up a little bit.
They soften and the whole thing is entirely edible.
You can find these in Indian markets and Asian markets.
You can also put in the freezer for at least a month.
They keep beautifully.
So there's our curry leaves.
And then the next ingredient is árbol chilies.
So we're gonna have the fresh serrano chile, and now I have four dried árbol chilies.
And these are gonna go in whole.
They're so beautiful, and they'll add a little bit of spice to our dal.
So four of those guys and then a couple of spices.
We have some cumin seed.
Oh, I love the smell of cumin seed, too.
So there's a teaspoon and a half of the cumin seed.
And then I also have a teaspoon and a half of brown mustard seed.
You could also use yellow mustard seed if that's all you have.
Alright.
So everything is ready to go.
We'll take it over the stove and cook it up.
Alright.
So I'm starting with ghee.
And some cooks like to use oil for their tadka, but I really love the flavor of ghee.
It's made by simmering butter very slowly until all of its liquid evaporates and its milk solids start to brown.
Then those milk solids are strained off.
And what's left behind is this really nutty fat with a really high smoke point.
So I'm doing 3 tablespoons in a 10-inch skillet here.
Ooh, look at that.
I just love the look of it.
Okay, so we're gonna put that over medium-high heat, and we'll let that melt here.
Okay, so I can see my ghee is starting to shimmer just a little bit.
I'm going to add my spices.
Remember, that's brown mustard seeds and cumin seeds.
And we'll just let these sizzle in the pan for about 30 seconds.
And you want to keep a really close eye on these.
They can burn quickly.
So not a good time to check your e-mail or take a phone call.
Stay with them here just for 30 seconds.
They're starting to pop.
I don't know if you guys can hear that.
I love that sound.
Okay, so that's a signal to add the onions.
So I'm gonna stir this up.
We're gonna let this cook for five minutes until the onions just start to brown at the edges.
Okay, it's been about five minutes, and the onions are just starting to get a little bit brown at the edges.
So I'm going to add the rest of our tadka ingredients -- the fresh serrano, the árbol chilies, the curry leaves, and the garlic.
I can't tell you how good it smells in here.
Oh, mmm, so good.
[ Laughs ] And the color is beautiful.
Oh, this is like magic happening in the kitchen right now.
Delicious.
Okay, so I'm gonna turn this off, and we'll go over and finish up our lentils.
It's been 20 minutes, and the lentils have really started to break down, which is exactly what we want.
So I'm just going to take a whisk, and they'll just fall apart when I whisk them.
They'll turn into a coarse puree here, and we want this to have the texture of loose polenta or oatmeal.
So I'm going to let it cook for about another five minutes, and it'll reduce just a little bit more.
It's been five minutes.
Let's take a look.
Yeah, it's reduced a little bit.
It's got this loose polenta, oatmeal kind of texture, which is just what I want.
So now let's season it up.
I'm adding 1 1/2 teaspoons of salt, and now I have 6 ounces of baby spinach.
We're making palak dal, and "palak" means "greens."
So baby spinach is great because there's no prep.
It's going right from the box into the pot here.
And I usually have to add this in batches just to wilt it down.
We're just gonna cook this for 30 to 60 seconds.
We just want the spinach to barely wilt here.
Okay, that is ready to go.
I'm gonna put the lid on and get everything together, and then it'll be time to eat.
Okay, it's time to eat!
The spinach is nice and wilted.
Still a beautiful green color.
I'm just going to add a teaspoon and a half of fresh lemon juice.
That'll brighten it up a little bit.
And I'm just gonna give it a quick taste here and see if it needs any salt.
Mmm.
Oh.
It's perfect, perfect, perfect.
Alright, this is my basmati rice that I had going while I was cooking.
I think one more spoonful.
And now our tadka.
Some of that all over the top.
And then I have some fresh cilantro to put on top.
Let me give it a try.
Mmm.
Oh, so good.
The smoky curry leaves, all the spices, the lemon, the garlic, the onion.
Oh, I can't tell you how good this is.
Super satisfying, delicious, and it's healthful, too.
So my kind of food.
So if you want to make one of my favorite recipes, use a 3-1 ratio of water to lentils.
And don't forget the tadka -- the real genius part of this recipe.
So from "America's Test Kitchen" at home, this fantastic recipe for palak dal.


Support for PBS provided by:
America's Test Kitchen is presented by your local public television station.
Distributed nationally by American Public Television